I don't know why I keep doing this! It must be a disease of some kind. I collect junk canoes. I could recite the list but why waste time? My disclaimer is that most of these junk boats have been sold cheap or given to folks who can't afford a canoe of any kind after I've fixed them up so they float and look somewhat agreeable to the eye! I think I've made a profit of 400$ over the past 8 years!
Before you continue please brace yourself for some very disturbing pictures. A cold beverage might assist in handling the what you are about to view!
My latest adventure is a 25 year old Mad River Courier. I saw it listed on Craigslist as a 17 foot Mad River touring canoe. When I laid my eyes on it for the first time I should have been smart enough to walk away but I didn't! I talked the owner down in price and loaded it on my car.
Back at my shop I carefully took some measurements. The length came in at 14'7" and the width was at 33". After conferring with a canoeing guru it was concluded this was a Mad River Courier, a solo whitewater canoe. I was now getting excited as I have been looking for a solo canoe that would fit my style.
 |
| Pine Seats Where Added, Bummer! |
The first thing I wanted to do was get out the pine seats, all three of them which meant getting the screws out. It almost made me cry that these had been put right through the outside of the hull.
 |
| Screws drilled through the hull to hold the seats in. |
|
In order to do this I needed to heat my screwdriver with a torch to burn through the junk that was used to cover each screw! It wasn't fiberglass and my guess was some kind of construction adhesive. It really stunk and I wondered what kind of fumes I was inhaling!
 |
| Heat Up |
|
 |
| And then burn through to the screwhead! |
At the end I had to do this 74 times! Next came taking off the patch that was on the inside and outside of the hull.
 |
| The inside patch, I thought it might be a diaper! |
 |
| The outside patch, already peeling off |
 |
| Peeling off the outer patch |
I started on the outside patch as it was already peeling off and it didn't take much work to get it off. A putty knife under the edge and it came right off. The inside patch proved to be a bit more of a chore. As I broke through the bond I couldn't figure out what the hell was under it! It soon became apparent it was a piece of aluminum bent into the shape of the hull and then screwed in, from the outside of the hull, with 25 sheet rock screws! Holy Crap! These were covering a jagged crack in the hull running from the gunwales down several inches.
 |
| A professional patch job! |
At this point I was having serious doubts and I had to step back for a bit and have a couple of cans of liquid courage. I finally came to the conclusion that I really liked the lines of this canoe, the measurements, and how deep it was and figured it was going to be worth the time and effort to bring her back.
I decided to leave the gunwales on to hold the shape of the canoe even though they were a cob job affair!
 |
| Another professional job on the gunwales. This was done on both sides. |
My next step was to find a way to get all the fiberglass off the hull from the patches. My first attempt was trying to chip it off with a sharpened putty knife. No go. Next I tried using a solvent to no avail. After that I tried hand sanding it off using a 40 grit sandpaper. Not enough strength in my hands to get it off. In the end I opted to use my belt sander to eat through the mess. I just kept gently touching the belt down on the first area to see how it would go. I had to be extremely careful to not go through more than the goop and I was surprised how well it went. I made sure to wear a mask as I didn't want to breath in any of that dust.
Saturday Jan 22
I got back on task with sanding off the rest of the patches. It went well enough but of course using a belt sander does make for a few mistakes but they are all in areas where new patches are going to be placed. The crap from the previous patches soon is gone.
 |
| Just the holes now, all the F/G coating has been sanded off |
I'm pretty insistent on having a clean surface for when the time comes to fill the holes and there is still old adhesive stuck in them there's the chance of an unclean bond. I bought some rattail files and tried them but could get the right angle to get the crud off. I did drill out one hole with a larger drill bit but didn't like the thought of make every hole so much bigger. In the end I thought about my Drumel tool and found one of the sanding bits and tried that.
 |
| Sanding bit to clean out the holes for a good bond later |
 |
| Dried Gunk in the hole |
|
|
 |
| Cleaned up and flared to accept the new patch |
 |
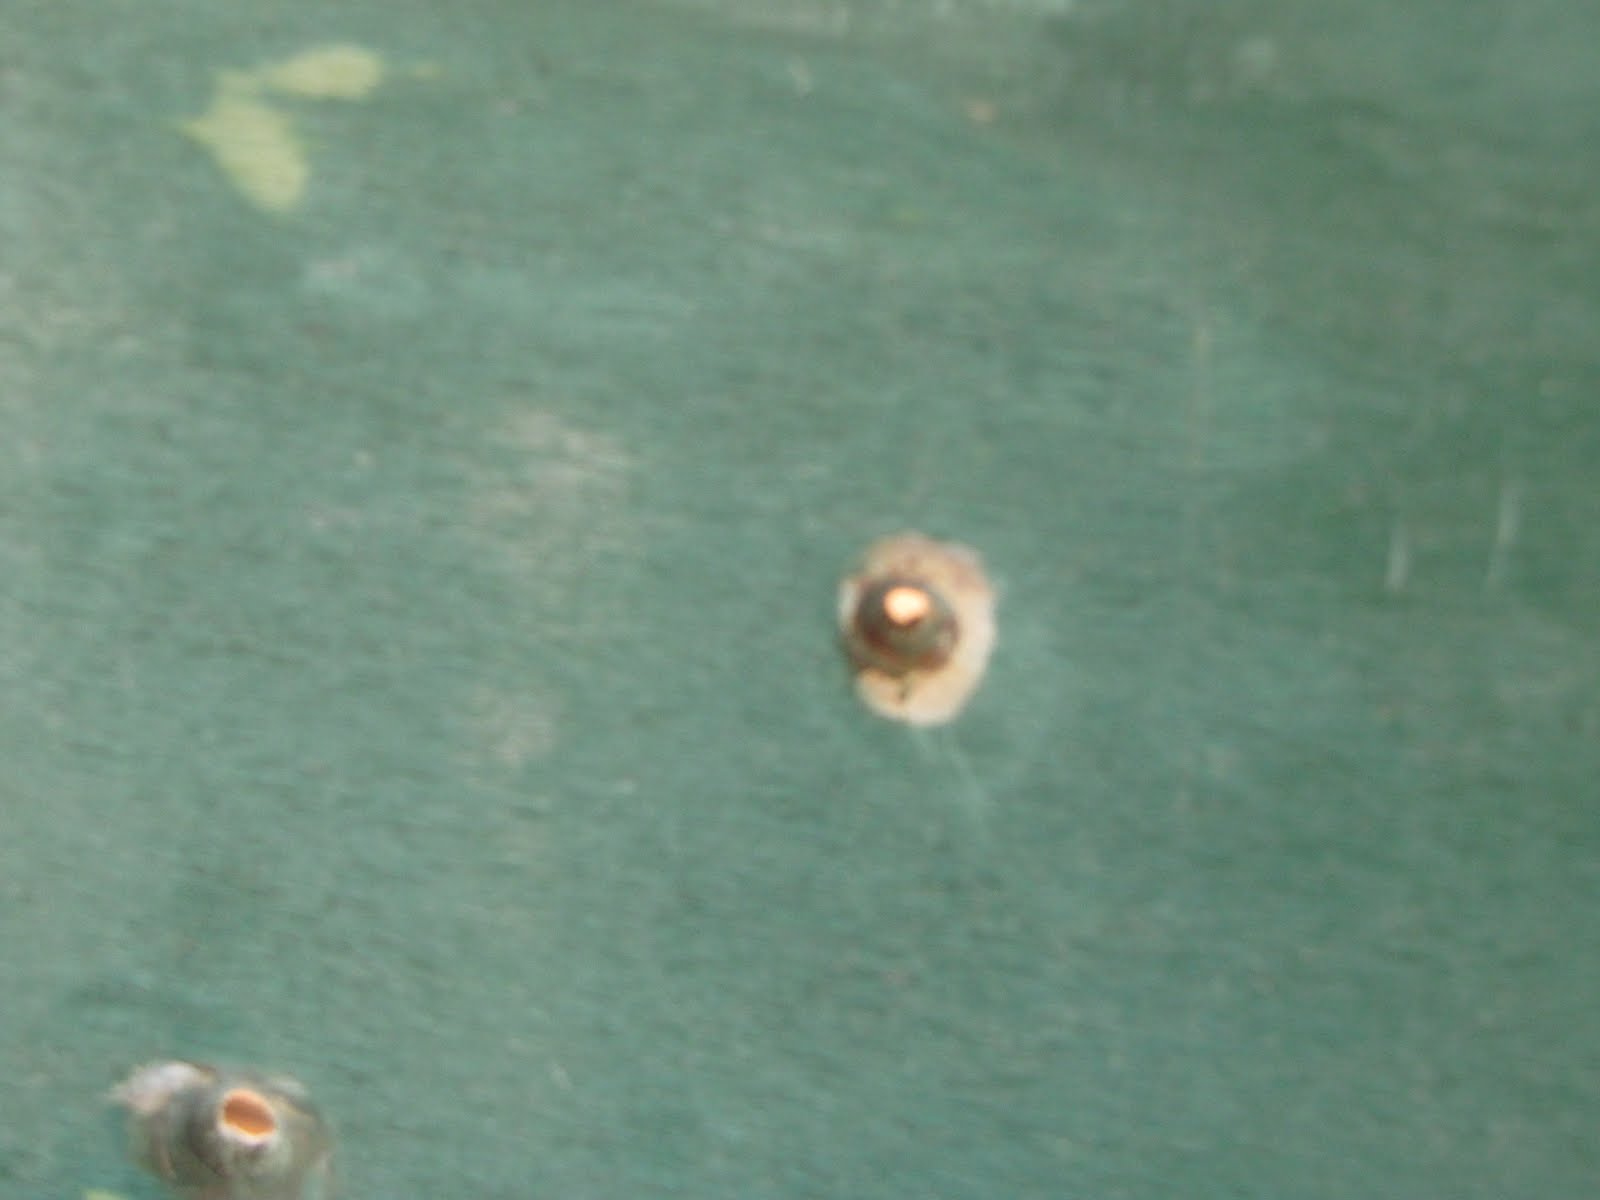
| One nasty ass battle scar! |
|
|
|
More to come.
January 23, 2011
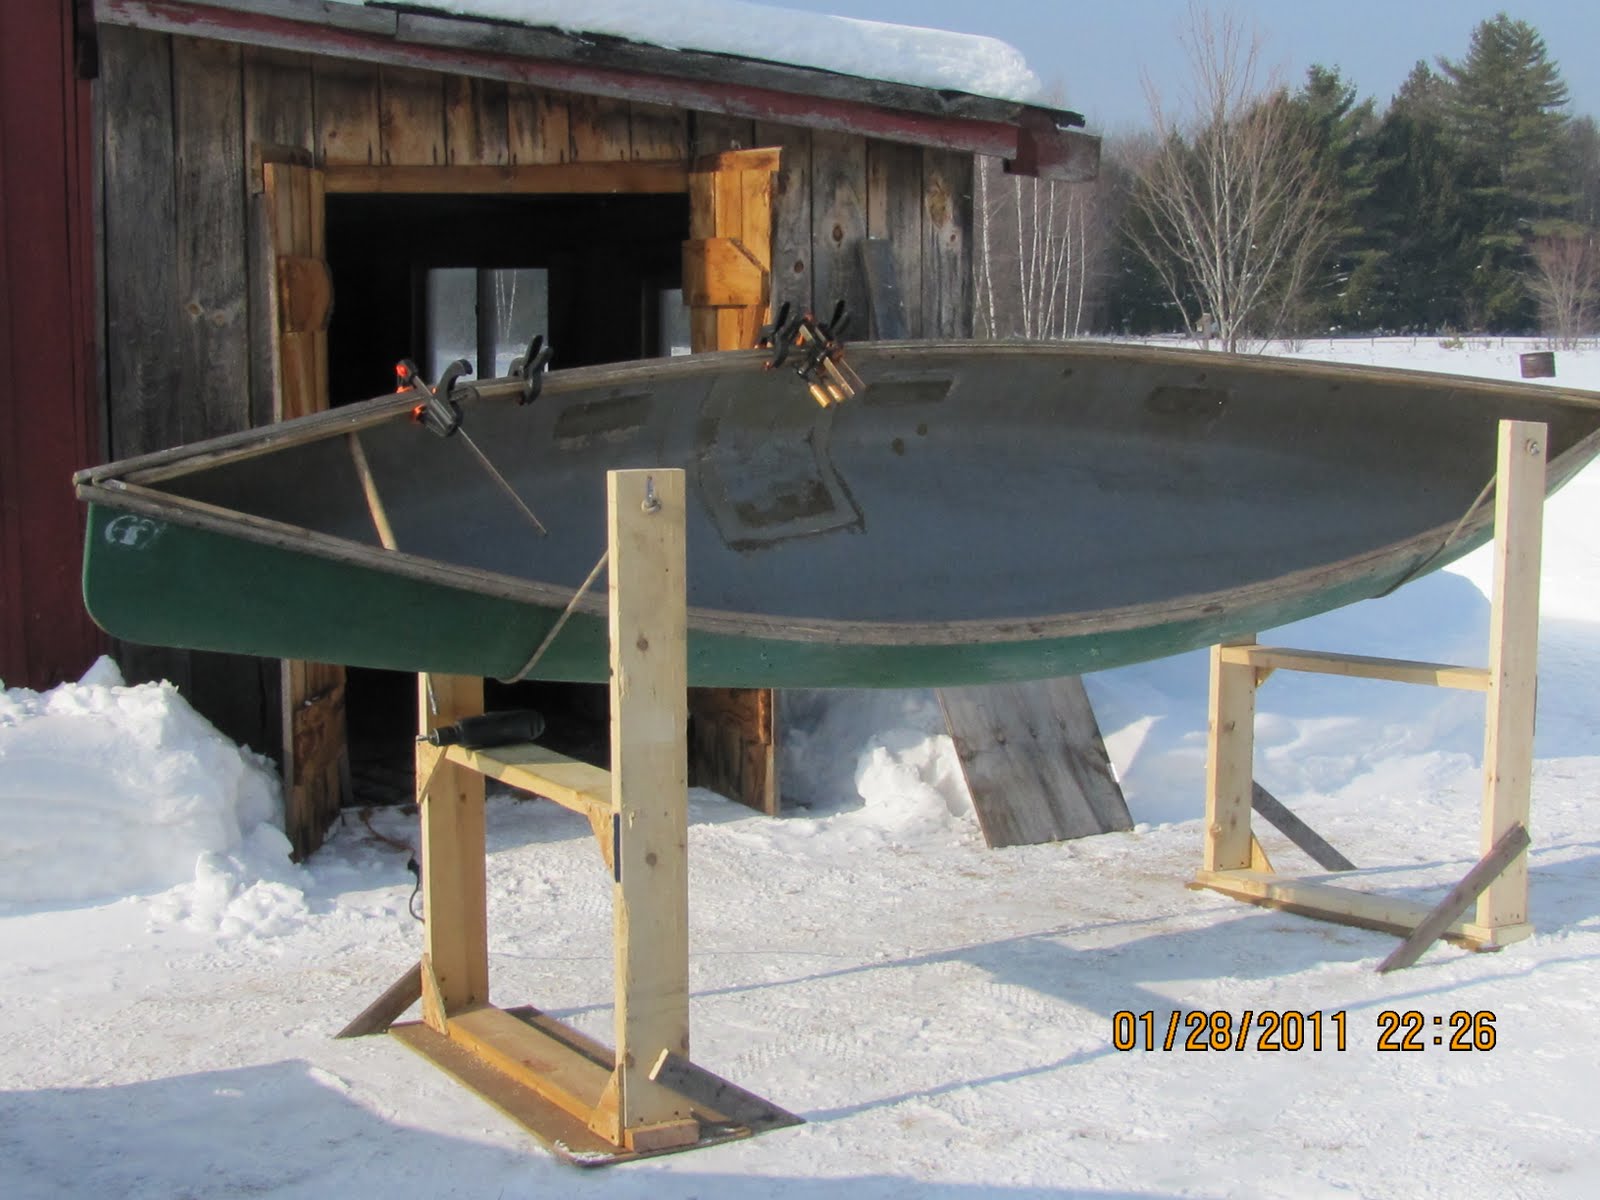
dickingPnet came up with. A set of cradles so I can tip my canoe to work on it without the foam blocks sliding out from under the boat.
I used a bunch of junk wood that has been sitting around, 2 x 6, and measured the verticals at 4'. I made the feet 3' long and braced them with a center support and then reinforced them with gussets. In the end I had to take some plywood that was cut several inches wider and longer than the feet and screw them on as my shed has a very uneven floor. Then on the verticals I drilled holes 2" down from the top and ran some old climbing rope through with a dedicated knot on one end and the other end to be used as a tie off so I can adjust the height of where I want the hull while I'm working on it. With this setup, crude as hell but works, I can tip the boat to get at the chines where some of the junk is without killing my back.
 |
| One of the new cradles |
|
|
|
 |
| Had to add the extensions to keep it from tipping while adjusting the boat |
|
Next few pictures are of the canoe at different angles on the rope cradles. It is solid, doesn't slide, and I can clamp it in place if need be. Using these I can angle my sander on the inside without fear of grinding to far into the hull. Gotta love junk wood and is why I end up saving the stuff.
 |
| Thanks for the idea Fat Elmo, works Great!!! |
I've had to do some homework with this project. It all deals with how I'm going to patch everything and with what. I am looking at G-Flex from West Systems, a product from ITWPlexus, thanks Charlie, but regardless I'll have to lay a patch over all the areas I imagine inside and out to really seal those off and create a tight bond. I am thinking of using Dynel instead of S-glass as my canoeing guru friend says it doesn't fray as much when cut. That has always been one of my downfalls when glassing, all those loose ends that just seem to spread like a bad disease when you're starting to spread the resin! BTW, I suck at that part! Regardless, I have plenty of time to decide as I can't do squat until March or April as I have an unheated workshop.
The local wood business where I can buy ash or just about any kind of wood you want, Goosebay Lumber, is willing to cut me new gunwales. I've ordered four 16' x 1" x 1" pre-cut pieces. In the past I've just picked up a plank but I don't need or want that much wood for this project. I'll have enough left over to make some carry handles. Price is more than I want to pay but what the hell is one to do? When those are ready in couple of weeks that will be the focus for February as I'll spend the time to mill them which is nothing more than planing them down, routering the edges, sanding and then after taking the old gunwales off measuring for new holes.
In the beginning of working on canoes I ended up buying quite a few tools. Until this canoe walked in my shop I thought for sure I had all that I needed. My last project proved me wrong and in the doldrums I'm going to buy a small drill press, just a bench top, so my drill holes will be straight and true. Nothing sucks worse than trying to get a straight hole in a piece of wood with a hand drill!
January 29, 2011
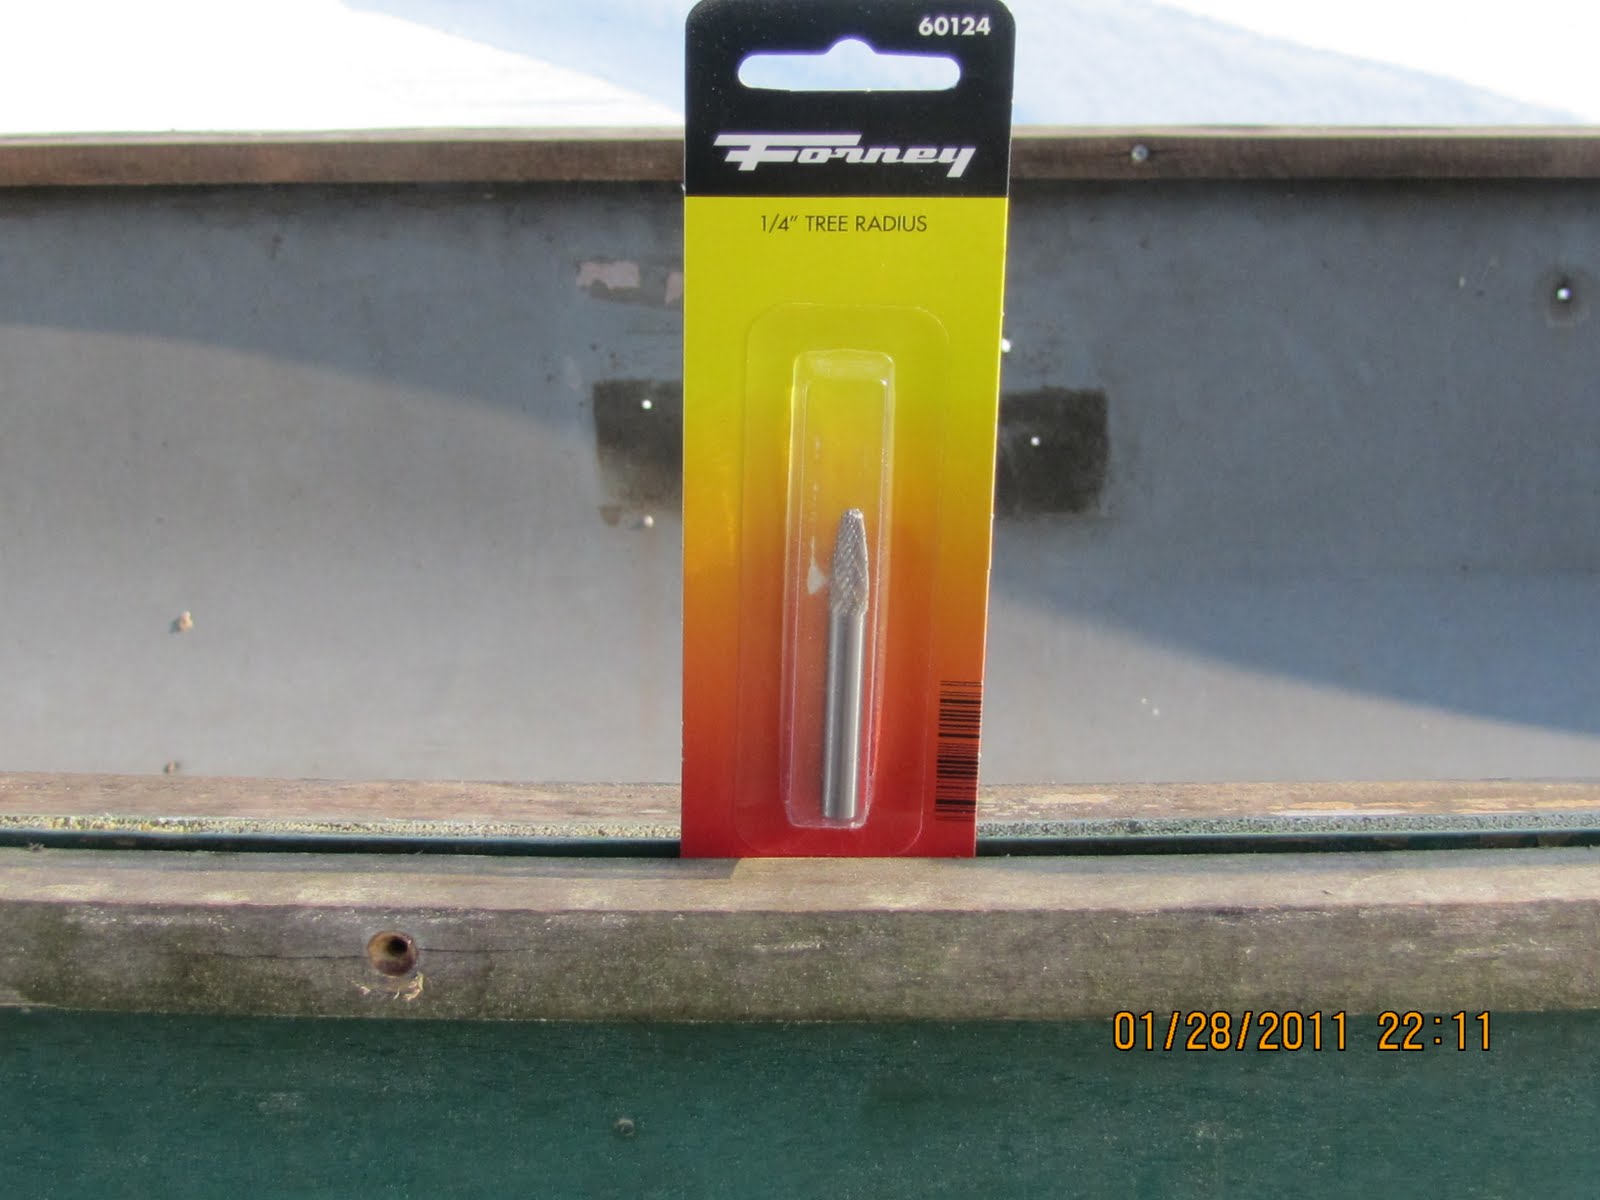
What a beautiful day out! A balmy 30+ degrees out, the sun was shining and it was a good day to work on the canoe. I ended up buying a new tool to clean out the drill holes. Cost was 16$ for this little drill attachment and I almost cried as I blew the cobwebs out of my wallet and forked over the green stuff. Carbide so I know it's gonna last a long time and it sure did the job a hell of a lot better than the Dremel sand bit. I got one whole side done, I'm not counting all the drill holes anymore as that is just too depressing.
 |
| New tool to drill out the screw holes. Works great, maybe after this job I can use it for dental work or cleaning out my ears! | | |
|
|
One side of the hull on the inside is sanded out of the crud, no pictures as the batteries died in the camera and none were to found in the house, that will come later.
More to come.
February 23, 2011
It's been a while since I've worked on this project. An accident with a ladder, snow shovel, and slick driveway saw my way to a broken vertebra, L1 for those interested. It has laid me low and unable to do much besides some research and planning. No physical labor.
My first break through was to go with vinyl gunwales instead of wood. Usually with wooden gunwales I mill my own, cheaper and I like doing it. Just not this time! So, the search began for vinyl. To my dismay I could not believe how hard these are to come by! I could drive to VT, ME, NY, MA if I wanted to find some but most places don't carry them and after an email or several I didn't get responses. My next recourse was to post on CL but when I searched the canoe section I found that someone had already posted that they were looking for the same thing! DAMNIT, curse the gods, other words spewed forth as I reread the post over and over. I just could not believe it. I said the hell with it and went to bed
The next morning over coffee I relay the story to my better half. She starts laughing...hard! It turns out she was sick of my sniveling and whining and posted looking for a canoe that was junk but still had vinyl gunwales that were good! It was her post I was reading!
The wait began and in a short time a 50$ canoe with damage to the hull was offered! Now began the waiting game that is so prevalent on the internet. Several days went by without a response and then on day three there it was! I called the number and the gentleman I was speaking with was like talking to the guys down the street! In a nutshell the OT 169 got hit by a plow blade and did a lot of damage to the bow but all of the upper works are in good shape. This is the second time I've seen a canoe hit by a plow truck, aint pretty is all I can say!
I pick it up in the morning and see what I have on my hands. As long as the gunwales are in good shape I'll be pleased! I see canoe surgery in my near future!
More to come.
February 24, 2011
Well I picked up the canoe and talked him down in price due to the condition. The gunwales are scratched and show wear but are sound with deck plates so I bring it home. It's a real beauty, eh?
 |
| Snow dusted rotten hull |
 |
| Now that is a lot of paint! |
My guess is that there are at least four coats of paint on this rotten ol' hull, so thick I actually cut a finger open while tying it down. My next step is to drill out all of the rivets and then with relish I will break out my favorite power tool, the sawzall, and cut that old hull into small enough pieces to take to the dump.
More to come!
April 9, 2011
Today promised to be a beautiful day out and it didn't let me down. We hit 60 degrees with clear blue skies and almost no wind. A perfect day to spend washing down the hull. I needed to finish off some sanding of old fiberglass which of course was all under the gunwales. I took off the makeshift gunwales having to deal with two stripped screws. Par to course.
 |
| I hate stripped screws! |
Next I took the belt sander and carefully sanded off the last of the fiberglass crude. The 11 inch crack was problematic to sand out. The shape of the jagged crack made it virtually impossible to sand all the way to the bottom of it where I drilled a hole to prevent it from splitting even more. I tried like hell to get some sandpaper into the last two inches but all it did was bind up and tear. I guess I'm going to use G-Flex on the bottom hole and as far down from the top as I can get and use Dynel and S-Glass to secure it all.
 |
| Trying to clean up the crack |
At this point I needed to break out the hose so I could wash the hull down of any dirt, lots of that, and any other crap that had made its way in over the last 35 years! Now I hadn't used the outdoor faucet since last fall but I had high hopes as I spent good money on one of those no freeze faucets. I went to the basement and turned on the water to it and then went out and turned on the faucet! Goddamn it, the water was barely trickling out! Apparently where the faucet runs through the foundation was partially frozen! I took a torch to it but no go, the wood was acting as an insulator! I just didn't have the energy to fuck with a plumbing problem as they always seem to take way more time than one plans on.
I took to plan B. Using various grades of sandpaper and steel wool I got almost all of the crude off the inner hull.
 |
| Tools for cleanin |
I was amazed at how clean it came out but it was a real bear to keep making passes over the same areas with different grades of steel wool!
 |
| Before | | |
 |
| After |
In the end the dingy inside almost looked fairly new, well ok, only if you don't look too hard! I still need to fix the outdoor faucet and spend some more time scrubbing down the entire hull to get any left over containment's off.
So now it's time to deal with that plumbing problem!
More to come.
April 10, 2011
Another beautiful warm day was in the forecast so I decided to work with the G-Flex to start filling the holes. It was a dismal affair with the outdoor faucet and ended up using buckets of water to scrub clean the area I wanted to work on. I decided to test seven screw holes through the hull. I put a piece of wax paper on the inside hull and taped the hell out of it and then began mixing the resin.
 |
| Wax paper and tape, is that enough tape? |
Now I've never worked with G-Flex before but resin is resin so it's all pretty straight forward. With good luck my better half showed up with these.
 |
| A slew of mixing cups for resin! |
I did small batches at a time as my plan was to fill screw holes. Using a popcisle stick I dripped resin into the seven holes and was dismayed at how it was almost drunk into each hole! I mixed up a second batch and repeated the process and finally some of the holes seemed to fill up!
 |
| Thirsty Buggers! |
One particular hole just wouldn't fill! I was getting pissed off so I taped a piece of wood on the belly side and filled it again! Stubborn bastard just wouldn't cooperate! By now I'm swearing at the tiny little hole and got out a bunch of scrap wood and braced the shit out of it so the resin would rise to the surface. No way was I going to be out done by a screw hole!
Now it's just a waiting game. Let the resin cure, peel of the wax paper and see what I have to sand. I think there's only about 70 more holes to deal with and then there is that nasty ass battle scar! All in all a good day!
More to come!
April 12, 2011
Today was time to plug some more holes and look at widening the crack to allow G-Flex to be applied. I took the wax paper off of the first patch to find that without a solid tape backing I now had mushrooms of epoxy to sand off! Just another learning curve!
 |
| Hello! Now Sand ME! |
|
|
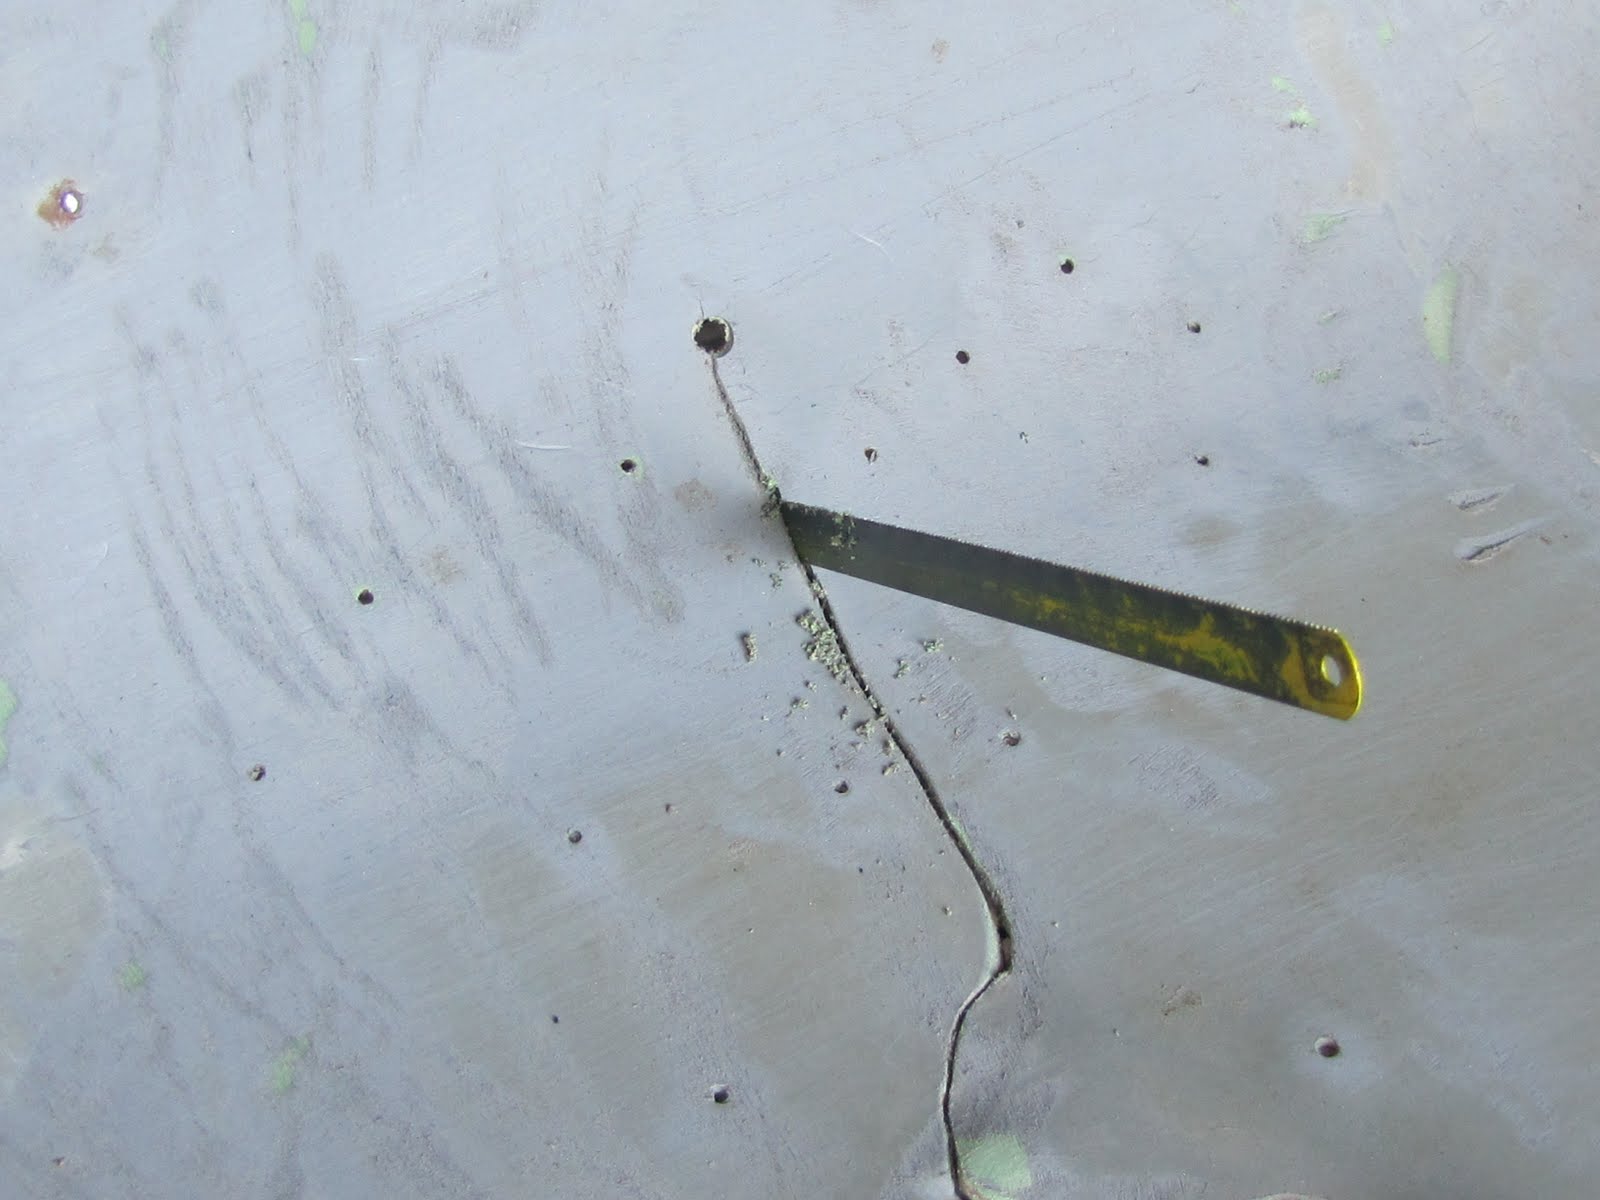
I have decided to plug all the holes and the crack and then spend the time to sand it all smooth in one shot. My big goal for today was to widen the crack at the bottom of it to get enough resin in there to make a good bond. After a lot of thought and reading a bunch of articles on it I got out a hacksaw blade and slide it into the breach. Very slowly I started cutting through making the crack wider by one draw of the blade at a time.
 |
| Slow Going but Works! |
I wasn't disappointed but it was a slow process as I was very worried about spreading the crack despite the drill hole I put at the bottom. Once the edges had some space between them, I still had it clamped at the top, I was able to put a piece of 40 grit belt sander belt in the split and sand the edges inside and out to an angle. I just don't think I'll get a chisel in there to bevel the edges enough.
After about 20 minutes of work it came out with a space that I thought would be best for making a good bond for the G-Flex. When this was done I proceeded to tip the canoe to fill some more holes. This time I left the wax paper off and just applied tape on the inside hull cover the next set of screw holes I wanted to fill.
I dripped the resin into the holes and smoothed it over to fill the holes and stood back and enjoyed a can of liquid courage and called it a night!
More to come!
April 22, 2011
Today was a perfect day to work on the canoe. After school being canceled due to the buses being vandalized by some punk kids, yeah us taxpayers will eat that later, I opted to take the day off. I have been filling the holes but decided to take a new approach with this next set. When you have over 70 holes to deal with I call them sets as I deal with them just a few at time.
The last few had the G-Flex oozing out of the hull due to the tip of the canoe. Nature of the beast. This time around I dripped in the resin and then put a piece of wax paper over it and then taped it down tight. I am hoping this will make for a secure and much cleaner patch. It sure makes the canoe look like a cartoon character after a fist fight!
 |
| Looks like band-aids! |
|
|
Although the weather is banner for today a cold spell with rain is moving in so hopefully I will be able to pull the tape off to see how it all fairs.
I now need to pay some attention to the gunwales and decks as they are crusted with grit and paint from the canoe I ripped them off. I think just a good scrubbing will take care of the grime and hoping the paint as well.
 |
| Vinyl gunwales that could look better with some elbow grease! |
 |
| Decks need some cleaning as well. |
If all the patches come out clean I have a plan for the crack which is now my last remaining obstacle with this part of the process.
More to come!
April 24, 2011
The day has turned out to be absolutely beautiful. Warm, sunny, a slight breeze, warm and after yesterdays snow and sleet event I was quite pleased to be outside. I was more than curious as to how my experiment turned out. I peeled the tape off the first patch and immediately had a shit eating grin on my face. It was smooth as could be, perhaps a quick sanding would be ok. Much better then the drips I had on the other side of the canoe.
 |
| After peeling off the tape and wax paper. |
Basically this is how I have been going about this patch job. I clean the hull and mix a small batch of G-Flex and start dripping it in to the holes. The same thing can be applied to divets in the hull which I will wait to see how well it bonds.
 |
| Popsicle Stick for the Drip Method |
|
|
I do wait a bit for the cooler weather and chemical reaction to help thicken it a bit. The next step is I cut out a square of wax paper and put it on the resin and hole and smooth the resin out so it is forced into the hole and out onto the edges as well and then tape it for a secure bond.
 |
| Wax Paper Band-Aid |
|
|
 |
| Masking Tape seems to work just fine. |
|
|
 |
| Don't ever use screws through the hull! What a mess! |
|
|
Due to the amount of holes I will need to look again in a few days to see what I missed but I am hoping none! Now, in the mess two screws broke off at the outside of the hull and on the inside of the hull leaving an ugly mess. I was able to back out one screw with a pair of needle nose pliers but had to drill out the other ruining a bit in the process.
 |
| What a bugger to get out! |
 |
| A half hour of work to get this turd out of the hull!! |
The screw I had drill out left a good size hole as there was a second hole right next to it. What a PITA but it's done now and I can address the mess and see how I'm going to go from here.
I'm certainly no expert on any of this and most of it is a crapshoot as to how I'm progressing but it all seems to be working. I have no illusions that this canoe will look like a gem when it's done but I've never been about how a canoe looks, it's about how it handles and that is really the bottom line.
So the waiting game continues. Progress was made today but tomorrow will certainly bring on some more challenges.
More to come!
April 27, 2011
Today was a leap of faith. I decided it was time to tackle the crack on the side of the hull. Using some clamps I did a dry run of how it was all going to fit together before applying the resin. I bought a 4" deep throat clamp, a 6" would have been better but couldn't find one. I used a couple wedges of wood to firm up the crack where it jigged and jagged. I also added part of the old gunwale to help hold the crack together.
Starting at the bottom I slowly started adding resin a little at a time letting it run down the crack to the hole I had drilled there. I kept moving it around as it started getting harder. I also had the canoe braced against a support in the shed and used a two by four and four by four to angle the canoe.
 |
| I taped on a little bit of wax paper to act as a collector |
 |
| The 2x4 was switched often with a 4x4 |
I played this tilting game for the better part of an hour and a half as I slowly built the resin up the length of the crack. When it started getting thick enough I covered it with wax paper and taped it down and then moved up and started all over again. I stopped about an inch away from the top of the crack figuring I would save that little bit for another day. I think I used about half a roll of tape to cover everything and took time to smooth the resin out under the tape at the end.
 |
| Wooden wedges clamped on the nasty part of the crack |
The waiting game continues. I am going to wait 2 days before I peel it all off and see how I did!
More to come.
May/9/2011
I took off the tape a couple of days later due to the weather, just letting the resin sit and cure. It's been damp and cold and the warmer days of spring are just not here yet. I was happy with the results as most of the patches were smooth. Of course there are a few more spots to add resin to but it is all good.
After a discussion about the gunwales and the amount of holes along the edge of the canoe I am going to fill them with G-flex and fore go the taping of both leading edges. The vinyl gunwales should drop down below those. The only exception will be where the crack is and that is going to get a patch of S-glass on the outside and Dynel on the inside to secure it for good.
Previously I had taken an orbital sander to all of the resin work I've done so far with 120 grit and sanded down all of the holes and the patch. I cleaned out the hull and then washed it down, damn I do have fix that faucet, and then hit the edges of the hull with alcohol, this required a couple of cans of liquid courage, and laid several layers of masking tape on the inside. Vacation days are going to be upon me in the next day or so and the weather is looking almost to good to hope for so the task of filling all those little tiny screw holes from the old gunwales will take up Thursday. I will say I have had great luck with drizzling in the G-flex, letting it settle, add some more and then cover it with wax paper and taping it. Very little sanding is required.
Thursday will be hopefully be the last of filling holes and then comes the patch work including installing skid plates. There is absolutely no way around that as both ends have been ground down to the core. Almost makes one cry to see how abused the ol' hull is.
More to come!
May 13-14, 2011
These last two days were spent filling all of the holes where the gunwales were. Since there were two sets of gunwales installed over time there were again more holes than I wanted to count. The next step is to start the large patches. So far I have used only 3/4's of the G-Flex but almost two rolls of tape! In the middle of all of this I had a change of heart and decided to go with wood gunwales. For 52$ I bought a 16' x 8" piece of ash to use for the gunwales, decks and carry handles.
My buddy Aaron came over and we rounded over the edges of 4 sixteen foot sections. It's always nice to have a second set of hands for this type of chore. After the hull is patched, painted and skid plates put on I'll be able to clamp the gunwales on, mark for drill holes and get them ready. In the meantime I received a package from Mr. McCrea. Please beware of getting packages from him. My mail lady is a sweetheart but she did have a strange look on her face when she handed me the package!
As usual we shot the breeze but she kinda kept it short this time around, made me wonder! It wasn't until after she left and I had opened the package I saw on the back side something Mike had taped on!
It said, "Your subscription to GAY TIMES AND TOYS has arrived" I might have to avoid the mail lady for a while. That's OK as payback is a bitch! ;-)
May 22, 2011
Another grey and wet day. Walking down to the shed is like walking on a wet sponge. The sump pump in the basement is working overtime, kicking off about every half hour or so and the woodstove is going to take the damp out of the house. This weather is getting old real fast!
My intent is to start to lay down S-glass over the cluster of holes. I measured out about 2" out from the edges of the holes and marked them.
 |
| Although they don't look it each hole is filled and is flush with the hull. |
|
|
|
I then taped out a square and used a piece of heavy paper cut to a triangle to make sure my joints were clean.
 |
| Gotta love these high tech tools! |
I covered the rest of the hull with newspaper, I do recall last years resin event with another canoe and the mess it made. I'm hoping not to do this again!
I am going to use West System 105 Resin with 206 hardener and maybe mix in some G-flex for the patches. As I was taping everything up I took a minute to look at the G-flex I have stored near the boat and it was thick as syrup due to the cool temperature. With it being so damp and almost cold I decided to wait until the weather decides to change for the better, warm and not humid or moist! Although this is a chemical reaction kind of thing the curing time could take a longer time than I want if I do it in these conditions. Damn it!! This has been one crappy spring! I kept looking at the sign I was given a while back and wondered if I ever would again!
More to come!
May 25, 2011
While waiting for a few days of sunshine and warm temps I've switched over to working on the gunwales. At least I can do that! I brought up two of them and clamped them on to the outside edges of the hull. I had cut them at 16' but with the curve needed around 15'.
 |
| A clamp on to measure for cuts |
 |
| Clamps are my friends! This long piece is going to the fire gods! |
|
|
I extended the ends on opposite sides so I could cut them. I have decided to taper them at the ends and put a top plate on instead of trying to build a deck that abutts with them. Once this is done I'll match them up to the inner gunwales, mark them and cut them and then clamp them back on again and start marking for the screw holes. That is going to be very tricky as I want to avoid previous screw holes but with two sets of gunwales already installed it's like looking at a piece of swiss cheese and deciding how it'll go will be crap shoot! From there it's nothing more than sanding and then treating the wood which I'm going to use spar varnish for. I'm to damn lazy to pull these suckers off twice a year and treat with Waco. Call me a heretic or any other word you care to use, I've been around long enough to have heard them all but do enjoy a new creative one!
So in order to do this I will need some new tools. One that I have considered for quite some time now is a small bench sander and a counter sink of quality, not those cheap ass ones that burn wood after the first use. Well worth it in the end but put getting that wallet to open at the store is like being in prison for the first night and those butt cheeks are tighter than the vault at Ft. Knox!
Now if this soggy mess they call weather here in the Northeast would just end I could get to task with the resin work!
More to come
May 29, 2011
I woke early and decided I needed to experiment with a large patch on the hull. I set up a table for a work area and got the resin and hardener primed and ready to go. I also added a touch of G-Flex as well to the mix just for shits and grins, hell it wouldn't hurt I figure! Now go figure I made a three pump batch which turned out to be way too much but I'm new to this. Damn, it is a waste of material!
 |
| Ingredients are G-Flex, 105 and 206 West System resin, S-Cloth, paint brush and a piece of plastic to use as a squeegee. |
I cut the S-cloth to the size of the patch I had taped out which was mistake number one but I will return to that. I next laid down a thin coat of resin and then laid the cloth out onto it using a paint brush that I had cut off the bristles to smooth out the cloth and get any air out.
I took the cloth and laid it on the resin and started to smooth it out. Goddamn but it did stretch more than I had anticipated and went off onto the tape and paper. I kept moving it around and finally had to concede that it is what it is. It should be mighty interesting to see how all that will peel off. So lesson learned is cut the cloth smaller than the patch as it will spread out. Regardless of how many articles I have read about this I simply forgot.
 |
| Patch with resin |
Now I should have done more homework and talked with my guru about this but I neglected to add any type of pigment for this patch. I noticed that it was rather milky colored. Not sure what that means?! This time I did take precautions and wore my DIPSHIT gloves. Read the story about How Not To Work With Resin which will fill you in on wearing quality rubber gloves!
 |
| There is a tale behind the DIPSHIT printout on the box! |
Cure time will take me sometime into tomorrow but I do have the gunwales to work on. I did manage to measure out for the seat and thwarts so I can get a start on drilling those out and then start the sanding.
So, once again the waiting game continues as does the learning curve!
More to come!
June 3, 2011
It is love at first sight! Dynel cloth is beautiful. It cuts clean, leaves very little wayward lingering fingers of cloth to contented with and didn't absorb the amount of resin I thought it would. I am impressed. Today was cool to say the least but it was a day off of work and work needed to be done on the hull. I ended up patching the outter hull with S-glass and while the canoe was tipped did three patches on the inner hull with Dynel.
Keeping in mind my mishap of not buying pigment I ended up with some acrylic paint that was a perfect match to the hull, Hunter Green. I mixed a tad of it into the resin for the next patch on the hull and it helped but the screw holes still showed through some. I should have used this with the G-Flex in the beginning. Dumbass!
 |
| One dollar paint. Probably will dry up before I use it all |
 |
| A small dab of paint to taint the resin and it matched. |
 |
| The holes still show but when the hull gets painted they will disappear, hopefully. |
I laid an S-glass patch on the outside of the hull and then got to work on the inside of the hull. With the canoe in the cradles on its side it was a no brainer to do as much patching as I could.
I chose Dynel for the inside patch and when I cut it it was a thing of beauty. No strings hanging off, nice an clean. I decided that I needed this cloth on the crack as it has a better and stronger bond then S-glass and I'll be using it on the out side of this crack as well.
 |
| Dynel patch, nice and smooth. |
|
|
By the end of the session I put on 5 patches. I have to sand out some of the holes I missed before I can lay a patch over it, gee with over 100 + I was sure to miss some. I only have 12 more patches to put into place being inner hull and outter hull. It has been a good learning curve with cutting the size of the cloth and laying down resin.
This is what I came up with today.
 |
| Inner hull Dynel patches. Easy stuff to work with! |
|
|
So once again it's back to the waiting game, time to cure, then flip the hull and do it all over again on the other side. Amazing how time consuming this is! I want to yawn and take a nap but it's time to start working on the gunwales!
In the morning I added the final patches for this side of the hull so I can flip it and do the other side. Only eight more to go!
 |
| I did use the Dynel for this outside hull patch. |
|
|
 |
| All four inner patches done. Three being from where the seats were drilled through the hull. |
It was a beautiful day today. There wasn't a cloud in the sky, the sun was up and the wind was down. I saw more birds then I could count and the dragon fly's were swarming to the point that they were hitting me in the head! I love those bugs. I did have company while I was working!
 |
| Hey Doug, KEEP SANDING! You ain't done yet! |
My only real regret for today's learning curve was mixing too much resin for the job. In the future I am going to make sure that I either mix a lesser batch or have some sort of item that could use a coat of resin ready and handy for an application of the bottom of the batch. I ended up just letting them harden and called it good.
 |
| Wasted Resin! Bummer! |
More to come.
June 5, 2011
This day is one of those defining days! I finally finished patching all the holes and crack! There is no way in hell I am almost done as the real work starts next and it's one of those dirty words! SANDING! I am not looking forward to that as I've already done my share and then some but it is what it is!
I started with the biggest patch on the canoe, where the crack is and all the holes that the dumbasses drilled to attach a piece of aluminum. If they hadn't done such a crappy job I may have left it! Regardless there is now G-Flex filling the crack, Dynel on the inside and out to bond it and the gunwales will pull it all together.
 |
| The largest patch on the hull, you can see the crack that has a fair amount of G-Flex in it. |
|
|
Since I had to flip the canoe to get to the other side I realized that I was coming up short on Dynel cloth so switched back to S-Glass for the interior work. I have come to the realization that I hate S-Glass. No matter how you cut it there are more loose ends then I have hair on my freaking head!
 |
| F this stuff! Hate it, hate it, hate it! |
In the end I covered 3 of the interior patches with S-Glass which shows every hole. Not something I really want but again, it is what it is. Now in the mix of this whole process I called Mr. McCrea and I asked about where the cloth had folded and was "puffing" out from the hull. The answer was to spread some wax paper on it and smooth it out as best I could. I needed to do this on two of the patches and it worked well. I laid a piece of wax paper down and then used my fingers to press out any air caught in that area which worked quite well.
 |
| I'll peel the wax paper off in the morning to see how it turns out. |
|
|
In the meantime I had some repeat visitors, Dragon Flies and birds!
 |
| Hey, Finish the Resin Work you Dork! |
|
|
|
|
I also was entertained by the headlines of the newspapers I was taping on, months old BTW, as I just don't spend a lot of time reading them.
 |
| Add caption |
So the patching is done, all the 100 + holes are filled and now I have to wait for curing of resin and then the real fun stuff comes.
Addendum: I finally counted all of the holes including the ones from two sets of gunwales. Total was 119. I have come to hate screw holes with a passion!
More to come.
June11, 2011
Woke up to rain and overcast skies but I was determined to start sanding the patches. I really wanted to do this outside but of course it wasn't to be. I gathered all the materials I needed keeping carefully in mind how the last sanding and laying of resin went.
 |
| Goggles, Respirator, 120 and 220 sandpaper, orbital sander and and old belt sander 40 grit |
After that one my eyes swelled up and I developed a rash on one wrist that stayed around for a week or so. I can only attribute it to the dust and the fumes of the resin. What a bear that was.
So this time around I got a respirator, goggles put on crap clothes and my Dipshit Gloves! (A hint to Mr. McCrea, I ran out of DipShit gloves!) I looked like something out of Star Wars but was happy to have it all considering the dust I was going to kick up.
 |
| Luke, I am your Father!!!! Hiss, hiss, hiss! |
I started on the S-Glass patches and was very pleased at how smooth they came out. Now the Dynel being much thicker didn't fair as well but it was what I expected. I really needed to put the Dynel down on these areas due to the spacing of the screw holes which I suspect would do nothing more then make the hull weaker especially with the crack. For eyeball viewing I think the S-Glass would give a more pleasant view but strength vs ascetics is what is important. As I have stated before a hull is meant for paddling, pretty is nice but I take my boats where I shouldn't and just can't seem to break that habit! It is what it is.
I took the orbital sander with 120 grit sandpaper on it and went to work knocking down all the high spots on the patches, the frayed edges of the patches and the resin I had spread out further then the size of the patches. I was amazed at the amount of dust I was creating, it was like a dust storm and I cursed the weather as I wanted to do this outside. In between using the sander I would take the belt sander belt, this is on a piece of mincell for hand sanding, and would hit the every edge of every patch.
 |
| The patches sanded out and getting rained on to get the dust off |
Ok, I'm really a novice to the this process and was worried about how far down to sand. I didn't want to cut through the glass but needed to smooth things out. The edges where the cloth had spread was my main concern as those needed to meld into the hull instead of showing. It was really a crap shoot for me but a call to the Guru confirmed I was on track, all was good. In all it took two and half hours to get it where I wanted it. I think I could probably have done more sanding but decided that overkill and doubts can be your worst enemy although to my inexperienced eye it looked like I needed to take it down more.
When I was done I shed off my cloths and bagged them for separate washing and showered as I really didn't want to have another reaction to resin. The next few hours will tell if I did a good enough job.
I try to keep in mind the learning curve and today's lesson has been protection from resin dust, the difference between different types of cloth and how they sand out and will look in the long run. I have no illusions that this hull will look cherry in the end but damn it's been one hell of learning experience so far and it will be good to see a 35 year old hull come back to life after being kicked all over canoe hell.
More to come.
June 12/13, 2011
Woke up to another crappy day which made me feel like this guy:
No resin work today, just to damp and cool out, hell it's freaking June and I have 3 layers on and my Muck Boots to stay warm! Still I felt the need to keep working and the gunwales were calling for me. I moved the hull back into the shed but knew it was going to be a long while before it dried off enough to tape up more paper for resin work. I ended up measuring for mid center of the canoe and cut a 33" long board as that will be the width of the canoe. I used a 1 x 3 and marked it in the center but kept coming up a bit short while measuring from the bow and stern but did split the difference and called it good.
I cut a six inch piece of junk wood as a spacer and used that to mark all the screw holes I need. Worked pretty good. Where the crack on the hull is is going to get an extra screw there just to add a tad more strength.
Off to the other workshop where I set up the drill press and used a counter sink for the screw heads and then drilled through from there. I did both the inner and outter gunwales. I did have to take out a window in order to feed the gunwales through, just a tad too long to do it all in the shop.
As with most projects I get involved with there is a screw up. On this one I ended up putting a counter sink exactly where the seat bolt is going to go. A fair bit of swearing made feel better...kind of!
 |
| What a freaking DUMBASS I is! |
I took a little G-Flex and some sawdust to mix in and made a quick batch to fill the hole. Sanding will come in a few days from now and it will be a good experiment to see how that mixture works!
 |
| Looks like cat puke to me, guess you gotta have cats to understand! | | | |
|
|
Got up this morning and decided to put a first coat of spar on the gunwales. I do have to wait for the one patch to cure before I sand so I only got to three of them. Next was to add a thin layer of resin on some of the patches. That went quite well and after a sanding I'll be able to move on to the other side.
Of course I still have the inside patches to deal with. Somewhere I see a pinhole of light at the end of this tunnel!
More to come.
June14, 2011
I laid down a second coat of spar varnish on the gunwales this afternoon. Just a few more to go and those will be ready. I keep mentioning the miserable weather we are having and it has been another day of rain and cool temperatures. Freaking June and I have the woodstove going again to keep the chill out of the house.
I was very disappointed that one of my patches on the hull ran. The tape and newspaper I put up peeled off on its own at some point in time and I can only attribute to the damp weather. More sanding is my future. The Dynel is still rough to the touch but the S-glass came out smooth as could be. I'm not sure what I am thinking at this point as almost all the patches on the inner hull where my knees are going to be resting is laid up with the Dynel.
The learning curves continue. This could be interesting how to get around this! Tomorrow I do the same on the other side of the outter hull and then tackle the inner patches. In between more coats of spar on the gunwales. I still have one thwart to cut and coat but that's an easy task.
Maybe, just maybe I'll have this boat put together enough for its first river trip with a new look by mid July!
More to come!
June 19, 2011
Got an early start today with sanding. I put on my Star Wars outfit and took the orbital sander to the patches. The Dynel is still thick but with a lot of sanding with the sander and then a shit load of hand sanding I got it down and kind of smooth. The S-glass came out smooth as a baby's ass except for one where I must have put down way too much resin.
The wind kicked up and had my flag ripping and was strong enough to rock the boat in the cradles and actually knocked the whole rig down several times whiles sanding.
 |
| Strong Winds Today |
|
|
In all I had something like 12 patches to sand and it went slow. I took my time and did a lot of hand sanding on the edges especially on the Dynel to get a smooth flow to the hull. I have come to the realization that I truly hate sanding, no seriously, I hate it with a passion! As I seem to have a thing about fiberglass dust I also and just don't enjoy this process.
 |
| 40 Grit Belt Sander Paper |
 |
| Orbital Sander with 100 Grit Paper |
Somewhere about four hours later I was as close as I was going to get. At least this time around I got to this outside in the wind! I got the hose out and washed down the hull inside and out. Letting it dry off I took time to go wash myself off of any dust. No need of a repeat of a few weeks ago.
 |
| Dynel patch and an S-Glass patch sanded. Used 220 grit on them |
With the canoe back in the shed I mixed up a small batch of resin and laid a thin coat on each patch. I am hoping they come out pretty smooth. If the Dynel comes out rough I'll lay one more coat on if need be but can put knee pads on those spots. Of course this meant more taping with newspaper, AGAIN! Aaaaaaggguuuuhhhh. This is getting mighty old.
Once that was all done I made way out to the CanoeShed and sanded, yes more Fing sanding, down the gunwales and added coat four to them. It's amazing that I can see every imperfection but most folks aren't going to see any, hell, it's just a hunk of wood on a canoe!
So tomorrow I flip the hull for the umpteenth time and coat the patches inside and out and will call that good. Another layer of spar on the gunwales and will call that good as well. A tad more sanding on the hull to prep for painting and then the last step is the skid plates! Gaining on it.
More to come.
June 21, 2011
I ended up doing a session of resin and spar varnish. I find it amazing how much time this takes. On the gunwales I'm putting spar on the back sides but of course I needed to sand it down one more time, clean it and then add the spar. I got done with that and moved on to the patches on the hull. I added a thin coat of resin on those and will call it good. More tape to be put into place and then spending a good hour laying down the final coat. Nice and thin and then continually checking for any drips. I am going to hit these in a few days with 220 grit sand paper, perhaps some steel wool and then wait for the paint job.
Skid plates are next on the agenda. The stems of this canoe have worn through down to the core which is dried out. It is not through to the inner hull but pretty damn close. The plan is to lay down a layer of West and then lay on Dynel with some pigment added in. I've been doing a lot of research on this and found this link:
http://www.moshannonfalls.com/installing-canoe-skid-plates/
I've also been talking to the guru and I'm hoping all will come out good.
More to come.
June 23, 2011
Today I learned a new shop trick. Now every shop is set up differently. In my case I'm varnishing gunwales so I have them laid out on sawhorses with a long piece of plywood to put my tools and materials on with a simple arm reach. I started applying the spar on the wood and as I went to wet the brush I ended up slapping it over my beer right where I need to sip it! Damn, not so much as sip out of it and into the trash it goes! Now that is alcohol abuse! So the new trick is to not put your beer next the varnish can!
June 24, 2011
THE SKID PLATES
I got an early start to begin work on the skid plates! Now I know how many people feel about skid plates and I could quote on and on what they have to say but in some cases it is just a necessity as you can see. Don't need to waste breath arguing this one!
 |
| That there be Core |
I have been dreading this part of the rebuild. One has to understand curves and figuring those out has been one of my crosses to bear, I suck at it! If you were to go back in my 50+ year history and ask all of the folks I've known they would all say, "What a DUMBASS, can't even figure out how to cut a curve, can the poor ass even count change?"
Hence the precautions and careful, hopefully, planning I'm taking. Can't hurt and might actually help!
Back to the topic. It is the same on both stems of the canoe. The first thing I did was to sacrifice an old shirt and cut the back out of it. This is the template for the Dynel patches I'm going to use for each skid plate.
 |
| The Sacrificial Shirt |
I draped it over the hull and traced out about where I wanted the patch. In size the template is about 32" long and then was cut into a tear drop shape. Damn, it was a bear to cut. I have a lot of respect for anyone who sews, cuts cloth and figures out how to ya sew everything together to make it work
 |
| Outlined for cutting |
|
|
 |
| The template. The tiles are 12x12 to give a clue to the length |
I took the newly cut hunk of shirt and kept placing it on the hull to see where I would place it. I'll need this to outline in chalk where it is going to go. I lost track of the hash marks I put down but it was lot. With a heavy wet fog and cool temps I've once again put this on hold till tomorrow when it is supposed to be sunny and warm. Now its time to pull out my Dynel and look it over for how it is going to get cut for these.
More to come.
June 26, 2011
Before the skid plates can go on I need to fill the wear areas and decided on using G-Flex. After cleaning both stems I taped up both areas and drizzled in the resin until it was almost over flowing.
 |
| Taped up and ready for resin |
Using my trusty wax paper I spread it over the area and smoothed it out in all directions trying to get the resin as smooth and flush as I could. This was repeated on both ends. I did notice a crinkle in the wax paper on the bow so I ended up taping over the entire patch.
 |
| Please Invest Your Money In Masking Tape! |
 |
| Looks like the Mummy! |
I have had success with this with other holes in this hull so it's worth a try. If it comes out smooth then the next step is to lay out the skid plates and start on that, a few days from now. The only down fall was that the Dollar Store didn't have any black paint left so I decided to go without. When the skid plates go on the mix will include black graphite and after it has cured I'll hit with some paint to hide any imperfections.
My first step of the morning was to lay out my Dynel and I have more then enough for this project and will have enough left over for the Malecite as well. Good deal!
Next on the agenda was power tool time. I needed to round off my carry handles and cut a rear thwart. In the pictures I have of the Courier the thwarts are a tad rounded. For the back thwart I opted to make it 2" wide and straight across. I know for outfitting I'll be adding some tie downs or some kind of dodad to it so the extra width is ok by me. I already bought a front thwart but wish I hadn't now.
 |
| A view of the thwarts. Click on the image to get an enlarged view. |
It took the table saw, router and planer to get it all done but ya know I just like working with wood and within 2 hours I had my first coat of spar varnish on them all. In the process I cut 12 pieces of ash for Mr. McCrea. Now how to send them on to him could become quite the challenge as I have a score to settle!
So here I am again, playing the waiting game.
More to come.
June 27, 2011
I decided to go ahead with the skid plate installation today. First off I used my template and cut out Dynel. Now I had been advised to cut to the bias. Yeah, I know what that means but looking at the cloth my eyes just couldn't see any difference and cut what I needed. Came out rather well IMO.
 |
| Plates cut out |
Next was placing them on the hull and figuring out where they would go. Each worn area was different in spacing so it was just a matter of trying to cover up what I needed to and then tape again.
 |
| Dry fit |
I marked all the lines with chalk and then cleaned everything off and got my resin ready. I did think I would have some troubles with air bubbles underneath the cloth but what the hell it was time for this!
 |
| Chalk lines well out side the cloth, that sucker will stretch! |
|
|
I taped both ends and got my resin together. I added the green paint to the mix, I was using my standard by now of West System and G-Flex and it came out good. Hum, this looks real good!
 |
| Lovely Ain't It?! |
Now here was the bitch of it all. The more I moved the patch around to straighten it the more air bubbles I created. I was after perfection as far as lining it up but then stood back and thought about it. Goddamn, it's a freaking skid plate! Who the hell is going to crawl under my canoe to see how well it is put on! It covered what I needed to cover, was long and wide enough and hell, this is not artwork! Done freaking deal!
About this time I realized that I had neglected one important factor! I wanted to use the black graphite powder in this whole mix. So off I go to get it and mix up a new batch of resin adding this in. I decide to lay a thin layer over the top of what I just spread out and it came out good. Happy face time.
With more than enough left in the bowl I tackled the bow and got about the same results. I will admit I was not as clean with the brush as I was on the other stem. Now in this whole process I had to contend with air bubbles and stretching cloth. I found this little item to come in quite handy!
 |
| A Foam Brush from a Kids Kit. |
|
|
I used this to keep pounding down the cloth and used the edges of it to roll out any air bubbles along the edges. I had about 5 of them in different diameters and they worked good enough that if I do more resin work I'll find these to have in my stash of tools. I do think they worked better then a cut off brush. The stern seemed to have more of an issue with the bubbles and I decided to just sit down there while the resin cured some and keep tapping away at them to smooth it out.
I'm getting tired of saying this but it's back to the waiting game. When it cures a quick sanding, an new coat with more graphite mixed in and then the hull will be ready to be painted! Holy Crap, I'm almost there!
Usually I end an entry with More to Come but this time there is a tad more to mention! I got a call from Mr. McCrea and during the course of our conversation I brought up that the gloves he had sent me were shit! The middle finger on every one that I pulled out of the box was split! I thought they were from a proctologist's office. Here ya go just so you believe me!
 |
| Damn, can ya believe that? |
|
|
Now of course this occurred while I was mixing up the resin and trying to spread out the skid plates. Goddamn but the next glove was the same way and then the next! What the F is going on here! I ended up grabbing a pair of gloves from another box, the last of 4 so I had to make it right!
There was nothing but laughing on the other end of the phone. Turns out Mike decided that a few split gloves on the middle digit was more than appropriate but down right called for! I have to say I was truly stumped about this never giving one thought to the depths someone will take to get one up on ya!
 |
| The Glove |
 |
| In Slow Motion |
 |
| I Think Ya Know |
 |
| Where This Is Headed! |
Apparently Mr. McCrea peeled open the box, pried all the gloves out and sliced the middle digit of the top 8 or so gloves! What is very disturbing is I can actually picture the Mad Scientist scene from Young Frankenstien,. McCrea at the work bench late at night creating havoc! Scary!
 |
| The Victims! |
|
|
So now I know the end of the mystery and will need to make a new label for my gloves calling them the F You gloves instead of the Dipshit gloves!
I will now also live in fear of rubber gloves, resin work and any package sent from Maryland!
Now I can say More to Come!
July 2, 2011
This morning I wanted to put a second coat of resin on the skid plates. I taped it off as best I could and mixed up a batch of resin with the black graphite powder. When I taped it off I left a space, eyeballed that, onto the hull. I scuffed that up with 40 grit sandpaper before hand and called it good.
 |
| The first layer |
 |
| Taped and Almost Ready |
 |
| More Taping |
I mixed up my batch and applied it and to my dismay the area of the hull beyond the patch was just sliding around. It just wouldn't stick and was showing the green of the hull through the resin mix. The one thing I have come to learn in this whole process is that the resin I am using has a long working life so I don't have to hurry like hell. I ended up pouring some graphite into a bowl and then wetting my brush slightly dipped into the powder and dabbed it, I mean literally, onto the hull areas that I wanted covered.
 |
| Wet Brush and Dip in Powder |
|
|
It seemed to work and covered the green of the hull. Whether this will just sand off or not is another question for down the road. Both of the plates will be spray painted when I get to that step.
I had moved the hull outside into the sun, it was a beautiful day and why not take advantage of the heat to help things harden faster. Within two hours the resin was firm enough to touch and I knew for prior experience that I wanted to get the tape off before it was rock solid. It took a bit of work but I got it off and only had to use my sharpest knife to cut through some of the resin to get the tape off in a few spots. I think it came out ok but could see where I got lazy before hand and will need to touch it up before I paint the hull. So once again it was an hour of prep work for 20 minutes of resin work!
 |
| The Mug Shot |
 |
| Side View Mug Shot |
|
With that done I attended to the last patch. I am still amazed how I could be so stupid as to miss a major patch job but I did. I had done the inner patch but not the outter one. I marked it off and laid on S-glass. I was really amazed at how well that came out. I'm not sure if I cut it on the bias this time or not, my eyes just don't see that but there was little in the way of frayed pieces sticking out and what was there was easily brush stroked into the weave again. I had on a happy face and my Topher T-Shirt, must have brought me good luck!
 |
| Hi Topher! |
In a few days I'll sand it and add another layer of resin and then will be ready for painting the hull. All of the wood work is done and just waiting. I do have to make two deck plates but that is easy enough and I will actually wait until I have installed all the gunwales and thwarts as my plan is to spread it out to 34" wide instead of the 32 1/2 and the original one I have won't fit. Another custom job to do but all is good. By the way it was a relief to pull out a pair of gloves without a split finger!
More to Come.
July 4, 2011
Happy Independence Day! While I'm waiting for the patches to cure I decided it was time to somehow peel off the old decals of the Smoking Rabbit. They were faded to the point of almost not being there but that nasty ass adhesive was. This will be problem with painting and new decal placement. I wasn't sure how to go about this and tried a couple of different approaches as they were so old and it looked like someone tried to sand them off at one point in time.
So I thought to myself that a heat gun aka hair dryer would warm it up enough to get a razor blade under it and lift it up. One should not think to hard, it hurts! I liberated my S/O hair dryer and got fresh blades and started the process.
 |
| Weapons of Choice. Hair Dryer and a Razor Blade, can see the top of it in the pic. |
 |
| Typical Razor Blade |
Well, this started out pretty good but the hair dryer on low was putting out enough heat to merit the use of a glove as I kept working the razor blade and the blade kept slipping around with the gloves on. It really wasn't going very well. I was getting pretty frustrated and worked on my vocabulary of cuss words which has grown with this project, I really should have recorded some of those words. I called McCrea, yes, I still speak with him despite his whimsical pranks, and lacking any type of solvent I resorted to lighter fluid! OMG you say, you heretic, you heathen, how dare you! It's a damn holiday, what the hell is open to buy some more acetone? Time to get creative!
 |
| The New Arsenal! |
I spread a couple of squirts on the decal and spread it around with a rag and then began dragging my the blade over it. I used one end of the blade to dig into the adhesive to make a mark down the length of it and then using both hands on the blade managed to slowly peel it up. It came up in white and I could tell when I was getting to the hull as it would start to turn green.
 |
| White and Green |
I had three decals to get off with each one taking me about a half hour to get through. My fingers will know what it is like to have arthritis in the morning, damn I'm old enough that that's probably my next ailment! It just plain hurt to hold such a small piece of metal to do such a mundane and stupid chore but I was intent on getting them off. After I got the sticky junk off I ran the razor blade tipping the blade back and forth over the area and then took a hunk of 220 sandpaper to it and then washed the whole thing and wiped it down with rubbing alcohol, the last thing in my dwindling supply chest. I think it came out ok and the new decals will cover scraps.
 |
| All Cleaned Up |
 |
| Before the Battle |
|
|
I was beginning to feel like my favorite comic strip character, Bill the Cat. I can identify with his look and had more then one occasion when I felt like coughing up a hair ball or two!
 |
| My Cartoon Hero |
In few days when all the resin has cured I will hand sand the hull with 220 grit or perhaps something else, Steel Wool?, and call it good. At this point I just don't think there is a whole hell of lot more I can do but call it a done job and painting the hull will be a welcome relief. If I never see another piece of sandpaper again after this next step I will be one happy man! So at this point in time I'm seeing not a pinpoint at the end of the tunnel but a freaking doorway, just that the door knob is missing but it's there somewhere!
More to Come.
July 6, 2011
Today was the final sanding day and I can honestly say I won't miss that process too much. I donned my Darth Vadar gear and proceeded to do one last blast on all of the patches as well as the entire hull. I used my orbital sander for the patches and then did the entire outter hull by hand using 220 grit. I followed up with 000 steel wool as well and then washed the hull with soapy water and hosed it down. I could probably do more sanding but the results are that the patches for the most part are smoothed into the hull and I really don't want to go much closer. Besides, it just plain getting old and I have enough gray hairs as it is!
On the inner hull I just simply washed it down using a scrubby and called it good. I will have to wait until I have the boat on the river to see if I need more attention on the inner patches. In the meantime I am gluing up some luan as it is 1/4" and if I want a thicker dimension of it I have to buy a full sheet at the box store and I have this on hand. This will be for the deck plates. After gluing them in 2 x 2 sheets I'll cut them to size after I have the gunwales and thwarts in.
So, if the weather cooperates tomorrow I will be painting and I am thinking I should be able to get the gunwales on later in the day.
More to Come.
July 7, 2011
It's Painting Day! I have been waiting for this for 7 months and some odd days and have been mulling it over in my mind one too many times as how to do it and how it will turn out. A judgement day so to speak. Before I headed to the store I took my better half's scale and weighed the hull without any woodwork on it, just patches, it came in at 43.5 pounds. Almost half the weight of my OT.
I end up buying Forest Green spray paint but the hardware store only has two cans of the deeper color and one of a lighter color. I buy all three and use the light one for a base coat.
I had put the hull on two sawhorses in the carport but the wind was gusty, not steady and I decided because the house blocked a lot of the wind I'd go for it out there instead of in the shed. Sick of that place. I put wax paper under each contact point so it wouldn't stick to the wood and called that good.
I was advised to use the tape for painting to cover the gunwales but man oh man what a chore that became so I switched to masking tape again cutting each curve with a razor blade.
 |
| Tools for the skid plates |
|
 |
| A mixture of tapes |
I probably spent an hour taping these up. Prep work is the key in doing this kind of work and I will say that it does just suck. Ok, got it done and was good to go. When I went to the local hardware store they had two cans of spray paint in the color I wanted, Forest Green and then I bought a third can that was almost a match and called it good but good is a relative term.
 |
| The paint. The odd ball is on the right. |
I started to spray that on as if it was primer and laid it thin but quickly ran out but it did cover almost the entire hull. It was a green that was so nasty and light I couldn't believe my eyes. So I kicked open the next can and started spraying it it was a deep dark green that I really enjoyed. The only bitch was that the nozzle but have been a little clogged and it came out in "streaks" and not a flat lay. I was bummed but kept going until it wore out. I took the next darker color can after an hour wait and started laying that on and was able to give a much better lay of the paint. It covered thicker and darker and gave the hull the tone of color I wanted. But, there is always a but in these type of plans, I started to run out of paint! Aaaaguuuhhh!
 |
| The Light Colored Paint |
I knew the local store was out so I had to travel to Concord to buy some more meaning I wasted more gas on the job then for the materials but it's the nature of this beast, has to be done. I got back and tackled it again and I was pretty happy with the results. The patches were there but not there unless ya want to look for them. I thought the 30 mph rule might apply but that just isn't going to happen.
 |
| That is the big Patch, can still see it. |
 |
| Two layers but a crappy pic, too much sun. |
I wanted to post more pictures but the sun's angle on the hull makes it shiny mess so I will wait until tomorrow to post again. In a nutshell the patches are there, you can see them to a degree.but that is about what I expected. I was more then pleased to see that the paint job did cover some of them up in a nice manner. It is interesting that S-glass did a better job then the Dynel but that was to be expceted due to the thickness of the cloth. Up close and personal you'll see every imperfection but it is what it is. Every scratch and ding is clear to the eye but beauty is in the eye of the beholder and I'm the beholder so if ya don't like it look somewhere else!
I am going to let this sit in the sun until it goes down as the can of paint says to let it dry for 24 hours for a good bond and when I add the gunwales I just don't want the paint to peel off because it is not dried enough. Tomorrow I will put on the woodwork as that will take the better part of the day with all the adjustments I need to modify the width of the hull.
I'm quite happy with the results as my expectations were on the low side. So now it's time for a beverage or several. I find it amazing that I might actually get this hull on the water!
More to Come.
July 8, 2011
This morning I got a better look at the paint job and decided that painting a hull is overrated. It looks good but I know it will scrap off quickly enough and decided to call it a done job for now. If I need or want to return to it I will tape off the gunwales and attack it again.
It was time to finally make this hull rigid again, hell, it has spent more time in the cradles then a baby does and today I decided to put the gunwales on. It took the better part of an hour getting them lined up again with clamps being my best friends. I had a pre-cut 34" 1 x 3 to spread out the hull as that is the width I decided on. I stuffed in at the marks I had made at about midway and placed the gunwales.

I kept jockeying the gunwales back and forth with the clamps trying to get them even as I did once before. I measured with my tape for all the pre-drilled holes I had made and said damn, what a good idea! Now I will say that clamps are my friends but a second pair of hands would have been better. It took over three hours to get it all together. The process was to drill into the holes I had made until I punctured the hull and a starter hole in the outter gunwales and then set the screws with a screw driver instead of my drill. I just don't always trust the drill and was afraid of going to fast and hard.
 |
| Tool of Choice |
|
|
 |
| One Screw Set |
 |
| Clamps and more Clamps! |
|
I did a set of three holes at a time so I wouldn't get ahead of myself and forget where I was. In all it was about 60 screws per side and my hands felt like hamburger afterwards but it was rewarding to see the two pieces pull together in a tight bond. What was interesting was that on two parts of the hull the material was thinner and I had to put extra clamps on them to really pull it in but there was still a gap.
 |
| Thinner Material |
|
I used 1 1/4 inch screws for this job and in only a few places did I need a longer one most of those being on the ends where the most stress was. When I get the decks on that will hold it securely. I do have to say one thing about using these plastic clamps. When the decided to let go they are like a freaking bullet and I caught one square between the eyes with a little blood involved. I have definitely refined my vocabulary with this job! Did I mention that before? In the midst of all this my back started complaining rather severely, all that bending at odd angles and I decided it was time for a brace. In my neck of the woods the farmers call it a girdle but damn did it help!
As I moved up the gunwales I kept moving the clamps to hold the wood flush with the hull. I had to give love taps with my drill and screwdriver to do that and it worked fine. Once those were in place I decided it was time to put in the thwarts and seat. Much easier said then done! My grand idea of pre-drilling the seat and thwart holes set me off a bit. Regardless of how much I messed with sliding the gunwales back and forth it seems I was off by close to half an inch with the hole placements. Of course this was after I had all the screws set. I had the seat in and the front thwart in and kept looking at thinking it was a tad off. I got out my tape and starting measuring and sure enough it was! What the F! How could that be! On top of that the bolts I bought came up short for the seat and the hangers, despite the fact that I cut the hangers by a half inch and will have to go buy some longer ones.
Now here was my other lesson learned for the day. On the end of the gunwales I decided early on to cut them at an angle and they seemed to work when I dry fit them the very first time. Not so now. They seemed to have not wanted to cooperate and want to stay flared out a bit from the hull.
This will be a sore point down the road as a lot of water will get in there and I can see rot in my near future. My thought at this point is to cut a patch and wedge it into the gap and screw them to that.
 |
| Add a Wedge in Here to Screw Into? |
I need to take all the thwarts and seat out to treat the ends with spar or resin for rot so this tale isn't over yet. If I need to drill new holes I can always fill the others with G-Flex and go from there. Just not sure about that as the holes will be very close to each other.
Despite all of these setbacks it looks good, is very solid and now it's fine tuning time. Never easy!
 |
| Come a Long Way Baby! |
More to Come.
July 9, 2011
This morning was a trail of wasted time, I'm sure we have all been there. I was looking for something to make the decks out of and taking my one trusty one that came with the hull I went to the box stores. In the end I came home empty handed minus a few hours of my time and short on gas.
I have luan stored away and decided that I was going to use this,. Using the old deck I used that as a template although because I had stretched the hull out to 34" I needed to custom cut them.
 |
| What Came With the Canoe |
I cut out a couple of 2 x 2 pieces of the luan and then traced one on the gunwales. Clamped together I made the cut so they would be the same dimensions and then spent some time sanding the edges down. They actually came out pretty good! I also laid the original on top of the new piece and the thickness was very close. Done deal.
 |
| Old and New, Pretty Much Same Thickness |
 |
| Fairly Close to the Original |
I know from using this on my Malecite I needed to stiffen it up quite a bit and covered both of them with resin. What was odd with this batch was when I mixed in my paint to help with the tint it got "thick" very quickly. This hasn't happened before and all I could think was perhaps the weather, very damp after a hard rain last night! Many air bubbles came up and no matter how much smoothing I did they persisted but hell that's what sandpaper is made for.
 |
| You Can Kind of See the Air Bubbles on the Left One |
|
|
I am contemplating adding some Dynel to the underside but may just go with resin. The plates are there for looks and shedding some water and won't be used for picking the canoe up as the carry handles will be added soon. So another day of resin waiting. I'll hit these up with a layer of paint when they are done and then attach them.
More to Come.
July 10, 2011
I got up this morning and decided to put the deck plates and carry handles on. First thing to do was to make sure I tied ropes into the bow and stern before I mounted the plates. I then painted the decks after a quick sanding of the resin and called it good. In the meantime while waiting for those to dry I started getting the carry handles ready.
I measured for them and then cut the angles on them to fit the hull. I had all of the hardware ready and remeasured before drilling the holes out. I got the bow one in and on the back one I was almost through for the first hole and despite being a new drill bit it got snagged and stuck! I took a set of vice grips and as I was trying to spin it out the damn thing broke right off just below the level of the gunwale! I had a tantrum! I was shouting and cursing and throwing tools all over the place (please refrain from this as you need to go find them later and I had no idea which direction I threw them in). I thought later I felt really bad for the drivers of the cars going by, it weren't pretty! BTW with the wood work on it weighed in at 61 pounds which is 19 pounds lighter than my Disco 158.
This of course meant I would have to cut a new one, round it over, put 3 to 4 coats of spar on it and then reposition it on the canoe and fill in the old holes with G-flex mixed with sawdust. Damn it, I was almost done!
To make myself feel better I decided to leave it as is for now and head out on a maiden voyage with my rebuilt boat! I was quickly loaded up and headed out to the Contoocook River boat ramp. It was a perfect hot summer day and the ramp was crowded as I expected. I off loaded and for the first time got into my canoe and started heading upstream. The Contoocook feeds into the Merrimack River at this ramp but I wanted to make sure I was within easy reach of the ramp in case of a mishap. I have had my reservations about this hull for quite some time. My last attempt at a solo canoe ended with extreme unhappiness and with all the time and effort I have put into this rebuild...well you can see what I mean, I don't think it would be a good picture of my sobbing on the shore!
My biggest concern was how tippy this canoe would be and I was more then pleased to see that I didn't have to worry about that. I could lean this way over on its side without and problems but still made sure I did it in about a foot of water. Just upstream from the ramp is a small set of rapids and although low I played in there for a bit. The hull turned on a dime and ran a straight path. I had more trouble hitting the bottom with my paddle then with the hull.
I decided to test it out on the Merrimack, much deeper, a headwind, what else would I have, and a harder current. As I eased out into the main channel I stuck close to shore but soon headed out into the center of the river. The wind was up but not bad and I had no problems with correcting for it but being a deeper hull, 15", I did have to attend to it and not be lazy. I had expected this. What was very surprising was how the V-hull kept me tracking. I did not have to work on that and considering this is supposedly a white water design I was really pleased! I played in eddies, spun the hull numerous times, kept tipping it to see how far I could go and just had a hell of a time. Please keep in mind that I'm far from an expert paddler, mediocre at best but I do ok while on the water trails but I could see where I could improve my skills with this canoe. My Hogged Back Saint Disco 158 only allows so much for learning curves in the paddling world. I am now wondering if I can pole this thing? Or maybe set up a small sail! Hmmm! Perhaps I should concentrate on learning how to paddle it first!
I only went about a half mile upstream as my still healing back was starting to yell at me so I finally drifted back downstream enjoying a cold beverage. I had a shit eating grin on my face and knew/know I'm going to enjoy this boat tremendously in the future.
I came back to the Contoocook and headed up a side channel that is pretty much a spillway for the spring run and followed that until I ran out of water and then headed to the takeout.
I do have some thoughts on moving the seat back about 3" but will wait until I have taken it with a load in it to see for sure. One last chapter to this whole process is getting decals for it. Considering how rough it was and the nature of the rebuild these will be "special" and I need to have them made up. I am thinking sometime next month they will be done and then this project will truly be done.
 |
| Purty Ain't It? |
 |
All of the wood work in
|
 |
| The Decks are on |
 |
| Loaded and ready to go |
 |
| On the water again! |
 |
| The Happy and Proud Captain! |
More to Come down the road!
July 12, 2011
The Beginning of Outfitting!
This canoe during it's rebuild has aquired several new monikers from the original Mad River Courier. My buddy Topher referred to it as the Colander due to the many screw holes and later when I actually took the time time count the number of screw holes it came up to 119. Hence the reference to the Colander 119. Hasn't got a damn thing to do with any dimension of this canoe! Now if you see me out on the river with this canoe and are awestruck by it you could pay humble homage by simply handing over all the beers you possess, 119 would be nice! Just kidding!
Well, it came very clear after the maiden voyage I need some type of carry thwart but due to the solo nature of this hull I can not put in a permanent one, it has to be removable. Mr. McCrea sometimes uses a strap system and sent me the components for it but it means it screwing pieces in. Until I have the seat placement worked out I started playing with an old carry thwart I had in the Canoe Shed. It was long enough and with some modifications I was able to fit it in place. I was going to drill through the gunwales but after standing back and looking at it all I had a revelation! Those do happen to me on occasion!
My leeboard thwart has clamps that hold it in place to the gunwales without a permanent attachment and I opted to install those for now. I can take them out and put them back on the leeboard rig as needed.
I had already measured out center length of the canoe and had marked it ahead of time. I cut the carry thwart to the size I needed and then drilled holes for the bolts that are part of the clamp system.
 |
| The Parts for the Clamp |
 |
| Notice the Angle of the Plate, I have No Idea Where to Buy Them |
 |
| A Top View |
|
|
 |
| From the Side |
 |
| In Place and Works Great |
With this setup it is a simple spin and off it comes and I can adjust it back and forth to a degree which is dependent on the width of the thwart and how far it will slide before the hull stops it. When I'm done with my portage I can take it off and bring it with me or leave it in the car. I love it when KISS works! The only thing I would like to do is add a pad of some type on the metal brace where it meets the gunwale to prevent scraping. Maybe that non-skid stuff you find in a tool boxes. Hmm!
In the end this may be the only thing I need and call it good. I'm pretty convinced that I will not be sailing this canoe so swapping out the parts will not be a problem. Another piece of the puzzle fits in.
More to Come.
August 13, 2011
I knew I needed to move the seat back and the morning was nice so it was time to do it. I had some thoughts about placement after paddling the boat several times. I unleashed the seat and then spent time moving it back and forth but knew I would be limited by the the existing holes. In the end I measured from the stern deck plate and decided on 5' to the rear of the seat. From dead center of the canoe that would be about 20" back.
 |
| Clapped in for drilling the holes. |
The only problem I had with this was that my seat was now very close to the rear thwart which I wanted to keep open for storage of certain gear but I really wanted to get off the center point. I think the real confusion came from getting measurements from a fellow paddler with a kevlar version which is longer than the RX version.
I knelt in the boat and made sure that when I was in that position I would still be behind the center of the canoe and at 33-34" wide it would be a comfortable place and I would have command of the hull in whitewater. In about an hour I had it mounted and was pretty happy with it. The test would come later in the day when a few of us would be putting in on the local river for an overnight.
I wasn't disappointed at all when I got the hull in the water. With a minimal load it trimmed nicely and for the first time I felt really comfortable in the canoe!
 |
| Small load for an overnight. The canoe was balanced just right |
I need to plug the holes from the previous seat placement and of course decals are the last step!
More to Come.
Now that I'm done with the rebuild of the Colander 119 it's time to make some observations on how the many parts of the rebuild are working and where I'm taking this old hull. Now in case you are wondering why I am referring to this canoe as the Colander 119 it has to do with an old friend who saw my first write up and called it the Colander. As I talked to people about the canoe it stuck. In the end I plugged up 119 holes with G-Flex and/or resin and glass. So the canoe now has an official name which she'll wear proudly until her demise!
August 30, 2011
Tropical Storm Irene had left and the plan was to run a section of the Pemigewasset River from Woodstock down to the ledges. I think that is in Thornton. On Sunday the river was at 18', Monday 10'. When we got there I believe the gauge read around 6' but it was dropping. I love the Pemi but you sure do have to hit it right as it is a flashy one. I don't think the levels could have been any better.
I have moved my seat back almost 20" from center and I'm glad I did. This was my first chance to run some whitewater even if it was only class 1-2. When I knelt for the very first set of rapids I knew I had done the right thing. I was now just a tad behind dead center, I know this because I have it marked for my carry thwart, and I had perfect control of the canoe. I had a conversation with the guru and at first I think he thought I was nuts to go back so far but I had a vision, nah, I just dicked around for a long while with seat placement before I set it in place, but a vision would have been good!
It was heaven! I headed right into a nice wave and got the bow of the canoe in the air! Goddamn, what a great feeling! All the months of work made this one of the better days of my canoeing life!
The river was pushy in the rapids and the S turns required some attention as much of this river has rock outcroppings that one can easily connect with in a bad way. I decided to play and kept cutting across the current to catch the eddy line but not get swept into the eddy. The Colander handled almost perfect.
 |
| Scott passing a rocky shorline |
Now I would like to mention that this river is one rocky bastard. It's like cobblestone if I am using the correct term. Rounded over rocks that litter it's banks from one side to the other and I think one of the most unique features of this river.
 |
| This what the Pemi shores look like |
Regardless of how careful one is paddling this river you're bound to bounce of a few rocks! Nature of the beast and I wasn't disappointed. A bam here, a bam there, correct, look for the next rock and keep going. Hell, we even managed to run the ledges since the water was high enough!
It wasn't until the next day when I pulled the Colander off the car that I noticed something very interesting! I looked for new dings in the hull and sure enough they were there, I knew I hit hard a few times and was also checking the paint job which of course was exactly what I expected as well. What I hadn't thought about was the skid plates. They took a beating as well and all I could see was that the paint had scraped off. The mixture of Dynel, G-Flex and resin makes for an incredibly tough bond and patch! This was something I had discussed with Mr. McCrea in depth about before I did it and it worked out well for this run and this run is a rock garden one.
 |
| New Dings in the Hull |
|
|
 |
| And some more |
|
|
 |
| Only surface, meaning paint, damage |
 |
| Dynel/Resin/G-Flex Mix is the Key! |
You couldn't even fit a fingernail under it. I'm quite happy with these and will use this mixture in the future for other canoes. Come time for winter storage if there is such a thing a new coat of paint on the hull and skid plates will see a new season.
More to Come.
October 14, 2011
Decks Plates Revisited!
I noticed recently that the deck plates I put on are already delaminating. In many ways I was not surprised by this. As I posted earlier I noticed the resin did not seem to want to work well with the luan I used. Mr. McCrea and I talked about this and the conclusion was that the glue and air in the wood fought hard with the resin and the resin lost! End of story!
They are staying on for now as I have yet to decide what to replace them with. A plastic lunch tray cut to size has been suggested, I've thought about plexiglass as I have some, and then there is the old standard of some ash I still have kicking around but I sincerely have my doubts about those kind of woodworking skills.
I still have more outfitting to do, tiedowns, D-rings, bungee cords for paddles and more. It seems this has been my real go to boat but there is some compition starting with the Eclipse, a sweet hull that still needs some winter work to get her back to shape.
Looks like I'll have to start playing around with materials and make some kind of choice as to what to do. As much as I hate to say this I am quite pleased that there is more to do with this old hull! Makes me happy!
More to Come.