January 1, 2022
Back in June of 2016 I bought a used Bell Rob Roy, the Bell Magic with a deck! Right off the get go I knew I needed to replace the gunwales and the little tiny thing that was called a deck. Well, that effort cost me months and months of trial and tribulations as it is not an easy boat to regunwale. Holy Shit the up sweep at the tip of the cockpit was severe and in the end I had to teach myself how to steam bend wood, a story all in itself! If you care to kill a six pack of suds then here's a link to that mess:
http://scooter-bangortoportland.blogspot.com/2016/06/the-satan-project.html
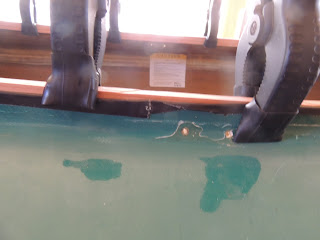
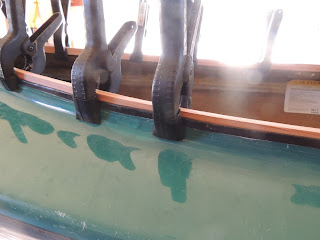
Kicking the rock down the road a few years and after a lot of use and wear and tear on the gunwales, mostly from racks on cars and trailers it's time for a new set as well as an anticipated inlaid deck. Unlike my first attempt(s) this time I have A PLAN, yeah A PLAN, cause ya know A PLAN is always good...until it changes!
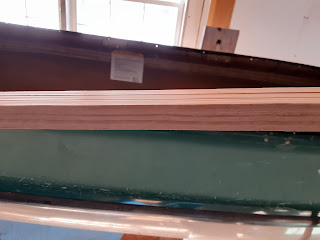
For this rebuild I'm planning on using a piece of Douglas Fir at 1 1/8" width by 1/2" thick for the outwale as one piece which of course means steam bending. There are naysayers out there that think I'm doomed for failure and perhaps that might be true but ya don't know if it's going to work until you try it.
In preparation I cut two pieces of this thin wood to 153", one being the outwale and the other to be trimmed down for the inwales. I need to pass them through my planner to even up all the edges so have them double sided taped together but will have to wait for a good weather day as I have to do this outside the shop, shop is too small for that length of wood. One other strip at 64" is for the scuppers I want on the inwale of the hull. I should have enough to resin them in at X inches, to be determined.
So after getting that all done with the help of cans of liquid courage I decided when it came time to steam bend the Douglas Fir which will have to wrap around the bow of the cowling I would need an assistant. My PLAN is to use a jig for steaming and then move it over to the boat to see what a miserable job I did but it is a PLAN goddamn it!
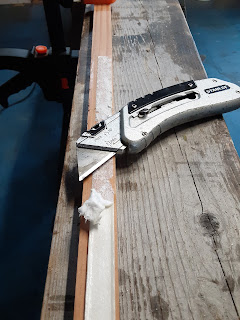
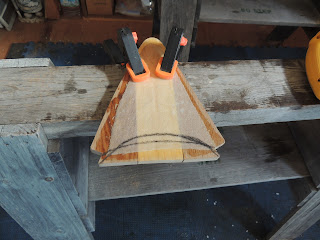
Using a scarp piece pine I traced the outside of the front of the cowling and then cut it out. Since this is for steaming I don't need to sand for a fine finish.
 |
| Cut out |
|
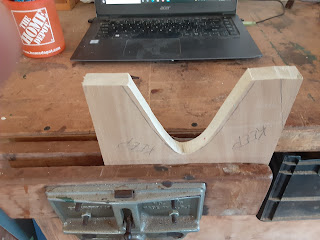
Another can of liquid courage got me thinking that in order to have that moist piece of wood wrapped at that rounded curve would need an aid so I cut out a reverse for lack of better terms piece that will clamp it into place.
 |
Male/Female
|
 |
| In theory this should work...famous last words! |
|
This is nothing more then a simple press to sandwich it together. Nothing fancy and age old technology that works.
So the next step is another bold one for me as I've only done this twice in the past with varying results and that is to put in an inlaid deck.
So there is More To Come.
January 2, 2022
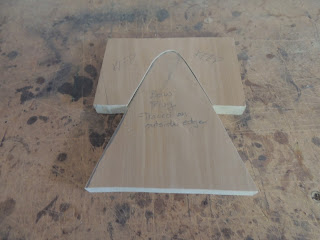
The original deck was this small piece of wood that barely covered the tip of the cowling. As I mentioned I want an inlaid deck and after reading on CanoeTripping.Net how one character, Alan Gale, did a beautiful one on a boat he was rebuilding I opted to go for that style as well. Here's a link to that build:
https://www.canoetripping.net/threads/yaer-yet-another-explorer-rebuild.127182/

Sorting through my woodpile I choose ash and butternut and came out with this although I am not real keen on the looks and may change it down the road. I cut it about a 16th of an inch oversize so I can sand it down for a tight fit and of course I need to plan it down to get the thickness I want.
Until I can get a good weather day to do planning outside I'm literally at a standstill for now.
More To Come.
January 7, 2022
Time to take the plunge and start sanding the deck. I started by hand knowing it was folly but didn't want to really use the Orbital sander as I only had to take a little bit off, maybe a 1/16th or so. OK, that lasted about two minutes before I said to hell with this! A can of liquid courage brought me to breaking out the OR sander, clamping the deck to a sawhorse and ever so slowly and carefully began sanding it down to the line I traced.
So it went like this, sand a little, dry fit it on the boat, Nope take more off, sand a little, dry fit, Nope, take more off, you get the idea. Of course a can of liquid courage helped with all that walking back and forth ya know, all of about a step and a half.
Probably about an hour later, yeah sometimes I do take my time, I got it fit snuggly and flush. The only problem was at the tip was a layover of resin from the original build keeping the tip of the deck from fitting tight. Well, I am smart enough to say to hell with it and leave it as is and having a little space there will help with draining any water that gets into the hull out. My thought is by clamping it in place when it comes time to install it will pull it in some.
 |
| That will work! |
|
|
The next step is to plane it down as the butternut, darker wood, is thicker than the ash and I do want to take it down to under three quarters of an inch or so.
More To Come.
January 8, 2022
Woke up to high winds and a balmy ten degrees out. After an hour and a half of snowblowing in those lovely conditions I heated up the shop and moved the planner outside and went at it. First the deck and then the gunwales. All in all it took about a half hour of passing the wood through and twenty minutes of moving sawhorses, the planer and extension cords around. Prep work always takes almost as much time as the actual project! In the end I was pleased with the efforts.
I think I mentioned earlier I used double sided tape to hold the gunwales together and then clamped them to hold them. OK, great in theory but not so great when it came time to pull them apart! I use double sided tape about as often as I win the lottery so when it came time to peel it off the wood it didn't! There might have been some bad, really bad language as I attempted to pull the stubborn shit off resorting to a razor blade which worked about as good as a butter knife.
 |
Planned down to under 3/4 inch, nice and smooth
|
 |
Double sided tape doesn't want to pull off!
|
 |
What's left after peeling!
|
So, now I guess it's spending time with a razor blade and mineral spirits trying to get this crap off and ya know I was smart enough on one gunwale to make sure I used loooong pieces of this stuff!
More To Come!
January 9, 2022
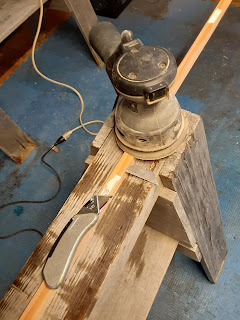
Well, I knew walking down to the shop that I had a new self imposed stupid assed mistake to fix. Who'd a thunk a piece of tape, oh special double sided tape, would kick me in the arse making for a long work day. I knew I had enough cans of liquid courage to see me through but I doubted my personal courage to endure the effort of cleaning it up.
I wanted to use mineral spirits to try to clean up some of the mess but guess what...none to found at the stores and none at home. On to Plan B...what is Plan B I thought? OK, a perusal over a lot of tools and thoughts and it came down to razor blades in various forms. Just for shits and grins I did try my Dawn/Vinegar Mix to no avail. Now it was down to grunt work. Oh my how I love grunt work!
So it literally came down to a utility knife, razor blade, a virgin razor blade with nothing hooked to it and the trusty and well used RO Sander with sixty grit paper on it.
 |
Utility Knife, Straight razor and RO.
|
It went something like this. Use the Utility Knife to slowly and I do mean slowly peel back the tape of course leaving a nice smear of residue on the wood. Oh how lovely that was. Then take the straight blade and rub it back and forth to get that residue off and then hit what was left with the sander.
 |
Step One
|
Of course I did the right thing on the two long pieces which was to put short pieces of the dreaded Double Sided Tape on so it was pretty straight forward and relatively quick to get off but on the short piece for some un-Godly reason I got a hair across my butt end and decided to put three fourteen inch plus pieces on. What the hell was I thinking?
 |
Hey Dumbass, why so long?
|
An hour...OK may a couple, three or so hours later it was done but of course done is an open ended word so I will have to break out the planner yet again to get the last of residue out of the grain of the wood that the sander couldn't get to without making a mess of the wood, can you say waves? The reason you ask for a second go at the planner? I need to treat the gunwales with either epoxy or varnish and if there is anything left over from the tape it might not adhere. Don't ask how I know this.
More To Come.
January 15, 2022
I posted on CanoeTripping.net about this steam bending and one member of the board who is a gifted and talented builder of canoes with an eye to detail chimed in.
"It looks like you made tight fitting forms, but remember you need to
allow for the thickness of whatever it is you are bending. If you mate
the forms with nothing in them, they won't be fair when you load them
with material. For example, if the inside curve is primary, then the
outside curve is drawn from the primary using the width of the intended
material ..... this is to keep the lines parallel at the clamping
distance.
If you take a matched fit like your picture and separate them by an
inch, the curve lines of the 2 pieces will not be parallel , meaning
they can't close evenly with the desired piece.
For that tight a curve, you will likely want to use thinner stock and
laminate up the final piece (e.g. try 1/8" strips, enough for the
thickness wanted).
Your clamping solution needs to be worked out in advance, you will get
30-40 seconds of real bend time and that needs to be gradual (material
dictates), it only bends so fast and if you push it too fast it breaks
.... so you need to get it into the form and bending as fast as you can.
Soaking the wood first is a good idea, the absorbed water increases the
amount of heat absorbed and gives a bit more bend time."
Well, I had not thought about that but in hindsight and with Cruiser's words of wisdom I spent some time this morning looking over the "press" I built starting with a dry fit as it is.
As can be seen with the original cut when married up with a spacer the width of the wood to be used doesn't come close to meeting up at the tip of the curve even when clamped down. With Crusier's words of wisdom I knew that the outside curve of the press needed to be widened some. Being challenged with dealing with numbers I did what I do best, eyeball it and hope for the best. I drew a line outside the existing curve on the outside curve and the got out some tools for the job.
 |
Drum Sander
|
 |
Need to take enough off to meet the new line.
|
For a good hour it was sand and test fit, sand and test fit just taking my time with a tiny bit of wood gone at a time until I got it to where I think it will work.
 |
A loose fit for the hell of it.
|
Without clamping it fits snug with the foam spacer/replacement for the wood/gunwale but I wanted to see how it would do with clamps as I will need those for the finished project.
 |
| It should work, nice and tight. |
|
Of course this is all good in theory for now and when it comes time to bend the wood will be the test. Just gotta love flying by the seat of your pants! Not the first time I've done it this way.
More To Come.
February 13, 2022
Today I decided to take the plunge and cut the deck to accept the inside gunwales. These two cuts are small, the size of my thumb nail. For the first cut I used my pull saw which usually makes for a very clean cut but I think due to the angle I was working on it came out a little rough so for the second cut I switch over to my jig saw. Of course I should have cut inside the line I had traced on but due to habit I cut on the outside so it is a little "big" but only by a hair.
Since I'll be putting epoxy on the deck and gunwales I plan to thicken some to fill the gaps and from some on the canoeing board who I mentioned earlier I believe did the same. If I don't like the looks before I do that I can always build a new deck.
Since I want to have the inwales with a scupper look I cut spacers which I'll epoxy in after I figure out the spacing. I really am looking forward to warm weather so I can move on with this.
More To Come.
February 25, 2022
I had clamped the inwales to the hull but it wasn't doing a whole
lot and to steam them from past experiences is nothing but a pain in
the ass. So while sitting in the shop and staring at the whole
mess it occurred to me to use the old inwales as a template/form to
try to get the bend depending on memory of wood to help out. I
dry fitted them with the use of many clamps from both sides to pull
it all in.
If this works, if only a little bit, the plan, yeah plans are
good, is to take the 8' long by 4" in diameter PVC tube I worked
up a few years ago to soak the new inwales in for a week or so and
then reclamp on the old gunwales and leave that way for a long
while. After some suggestions from members of CanoeTripping.Net
this should help with bending them. We'll see. A few
pictures for the hell of it.
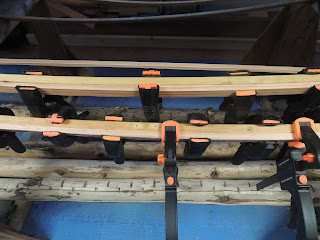 |
Clamped two ways to make it square
|
 |
The wider is the old inwale
|
More to Come.
March 5, 2022
It was time to cut the curve on the deck. I had been putting this off as I know this is usually a crap shoot for me getting the curve right. I ended up free handing it with a pencil and on attempt number two I got it right or as close as I could. Sanding would fix any off sets so went with it.
 |
Freehanding the curve with a pencil.
|
 |
| The cut with notches for the inwales. |
|
|
|
Due to the cuts I made at the notches one is a little thinner then the other but I can live with that. In the first picture you can see where I laid Dynel cloth on it to keep the seams together even though I used G-Flex to adhere them as I've done that on other joined decks.
Now since it's the beginning of March I only have another two months to wait until I can get to the job of steam bending the gunwales. Twiddling my thumbs waiting!
More To Come.
March 21.2022
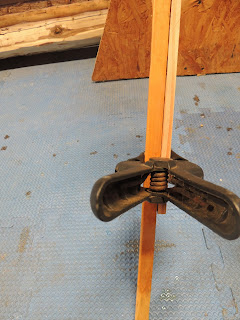
A leap of...hope...prayers...ignorance was the next step. Considering the width of the inwale I had hopes of soaking the wood which I did for two weeks next to a floor heating vent if that makes any difference. My hope was that the wood would bend at the front end where the upward sweep starts on the sheerline. My prayers would that it would but in the end it was my ignorance that rode high and proved me to be an idiot. I should know better.
I clamped the inwales slowing working from the back end forward. Just forward of the seat the sheerline lifts and take a little turn inward so the angle is looking at me with my wet wood going, "HEY, DipShit, This Ain't Gonna Work!"
But from the back end to the seat the inwale rides nicely. Yeah know, it took one can of liquid courage to see the outcome and the end result is I'm gonna be steam bending wood again to break the Lignin down for that bend a vertical push. It'll be the second time I have done this on this hull. A few pics.
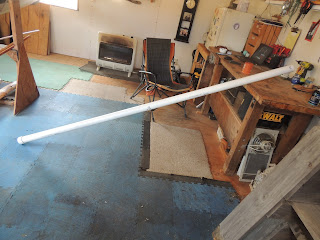 |
An 8 Foot PVC Tube. Bottom cap is glued on.
|
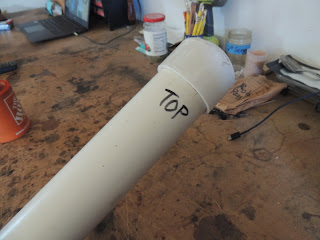 |
Removable Top
|
 |
Stern end fits flush, sweet
|
 |
Near the seat, not so sweet, it's not flush
|
 |
Way Off, the sweep is telling me...
|
Am I disappointed, nay, I've been working with wood long enough to know what "might" work and "will" work but sometimes it's worth a try. Thank God for my shop fridge and cans of liquid courage. Next step is to move on to steam bending. So be it.
More To Come.
May 2022
Well, it was time to steambend wood and I will give you a heads up not all goes well when you think it it will from past experiences. I spent some time setting up the steaming process and than sat there twiddling my thumbs waiting for steam. In the past it worked well but this time it was the middle finger to me from the set up! First off I filled the gas can/old and clean and used before for this purpose with too much water. These videos kind of explain it:
https://www.youtube.com/watch?v=PZ-nVOG8ojs&t=18s
https://www.youtube.com/watch?v=pD_-gVlZoT0&t=7s
https://www.youtube.com/watch?v=rFZjmXlO7gc
https://www.youtube.com/watch?v=m5XboTJqutQ&t=5s
I wish I could figure out how to merge these videos but it ain't happening. So it was a dismal failure but I put the blame on operator error. I do need to look at the burner as it was burning yellow and not blue so that tells me something is wrong there. Does this mean I giving up this idea, hell no, just a set back.
In the meantime I putting the old gunwales back on so I can get the boat out despite my back problems. I've spent time sanding them down and will retreat them with a new coat of varnish and I'm working on a new seat which will hopefully raise me up about two inches which I needed right from the get go, so for now...
More To Come.


