For a while now my buddy in VT had been telling me he got a Mad River Adventure canoe from his sister that needed work on the stern. Now in my minds eye the MR Adventure is this ugly thing:
http://www.madrivercanoe.com/product/index/products/recreation/adventure_destiny_series/adventure_14/
After several discussions he assured me that this was really a canoe and not that ugly thing! I kept disagreeing with him! When I got to his house I was stunned to find a real canoe and couldn't believe it! I had never seen this hull before and honestly thought that the only Adventure was the ugly thing! What really sent me reeling was how light it was considering it is made of Royalex! I racked it and headed home.
Once I had it on sawhorses I did some measurements. Fourteen feet long by thirty-six wide and a free board of fourteen and a half deep, that is some serious free board! My Courier has that beat by only half and inch! I started looking at the dent and wondered how in the hell I was going to get that popped back out, deep and long. A hole had worn through the other side and I could only wonder how in the hell did this damage happen?

 |
| Dent and Hole |

http://www.madrivercanoe.com/content/madrivercanoe.com/assets/page/archived_catalogs/2005%20Mad%20River%20Catalog.pdf
As far as getting the dent out my thought was to use a heat gun but I am very leery of using those as I usually end up doing more damage then good! He suggested a halogen lamp which I several of. I decided to give it a shot!
July 9, 2014
This morning made the plunge and started to setup for getting the dent out. Now, I have now maxed out my working space and had to empty another shed of mowers and the such to make room for this. Goddamn, I either have to downsize or build another outbuilding! With whatever had on hand is what I made due with. Within a half hour I had it all jury rigged and turned on the lamp.


Being smart this time I put a glove on because this material was now hot, real hot! I wondered if I had gone to far yet again! I kept rubbing it and pushing with my fingers until it started working back out. After a good ten minutes I got it as far as thought I could and then planted my fist against and moved the light back so it could cool. Another long wait but it panned out just fine! It held fine and I figure I can now just fill in any gaps with resin and thickener to try to get it as smooth and uniform as I can.
Now I knew this would not be a perfect fix, the crease in it turned out to be a tad too stubborn and I didn't want to keep heating the RX, I could start to smell it! In the end I was OK with the results.


Now in the meantime I talked to my VT buddy and said I really liked this hull and he should consider selling it to me. I was amazed when he replied, "It's yours! We'll figure something out later!" The plan has suddenly changed to make this into a solo!
More To Come!
July 19, 2014
Today was an experiment. After mis-measuring a brand new thirty-three dollar seat, cutting it wrong, drilling through the end of it and finally setting it aside I decided to use the bow seat which still had enough length left on it to move it to the solo position I wanted. The only problem is that it's a cane seat and I hate cane seats! Ask my scrawny ass about the several that have failed me in mid trip! Enough said on that subject!
After doing a bit of research I decided to try to either steam it off or use boiling water to heat it out. In the past when trying to get that freaking spline out I've damaged the seat. I thought steam would work the best so I got out my stove, a few small and thin screwdrivers, a pair of gloves and a can of liquid courage.


 |
| Cleaned Out |
 |
| Future use? Fire Starter! Ha! I hate cane! |
So I did have to take a utility knife to cut out a few scraggliers but it turned out much better than I thought it would. Next I sanded down the entire seat to almost raw wood. That took the better part of an hour but I don't mind it so much. The plan is to throw three coats of spar varnish on it but in the meantime I had to the dreaded task of placing it in the canoe hopefully correctly this time around. Hell, this is the last freaking seat I have to play with!
I decided instead of cutting it right off I would drill the holes first but I wanted to patch the old holes first. In the past I have used Plumber Epoxy to fill holes and I swear by the stuff. I have used to for my poles as well and going on almost twenty years with one of them it is still holding strong.
I pulled a hunk off and spent a good ten minutes rolling in my hands to mix it and then rolled it into a long strand that would fit through the holes I was trying to fill. It took a little doing but it worked.


Now on the brand new seat I had drilled holes at fifty-three inches from the stern of the hull as from spending some time sitting in it I thought that would get me about dead center while keeling as this is going to be a whitewater boat. I had thought about make my own hangers but decided to save time I'd use the ones that came with the boat. Using the front holes I drilled already I carefully measured out for the width and this time came in right on the mark instead of freaking quarter of an inch off. Believe I must have measured that a dozen times before I made my marks for drilling.
 |
| Front Bolt is at 53" and the rear hole was drilled out. |


 |
| Using the Existing Hangers |
 |
| Seat Mounted in Dry Fit |
 |
| Good Spacing from the Hull |

More To Come.
July 25, 2014
It was time to finish this seat and get it mounted again. Today was a simple task of cutting webbing and putting it in to make a new seat. This is a very straight forward and easy job to do once you have your webbing on hand. I had to search around but finally found some without ordering online, Rocky's Ace Hardware. Ah Gawd they have everything! Almost like an old fashion hardware store from when I was a kid!
I bought thirty-six feet of webbing cause ya know it goes fast on these kind of projects! The first thing I do is lay out the seat and the pull out the roll of webbing and pull out a length and start wrapping it around the seat to see where I'm going to cut it. On my work bench I have a bunch of hash marks and today added two more to mark the length I needed to cut. Now I should specify that by cutting I mean melting the webbing to the ends are melted and will not fray. To do this I use a few simple tools that most folks have, a propane tank, a putty knife, a staple gun and a measuring tape.

 |
| Using a blow torch to heat the putty knife |
 |
| Cutting/melting the web |
 |
| A second later all done! |

This is the second time I've done this and I just eyeball how close to put the webbing. Any mistakes will be hidden by the second round of webbing in the weave and of course being me doing this I was off a bit but is all good. I cut out the pieces and laid them out to see where and what I was missing.
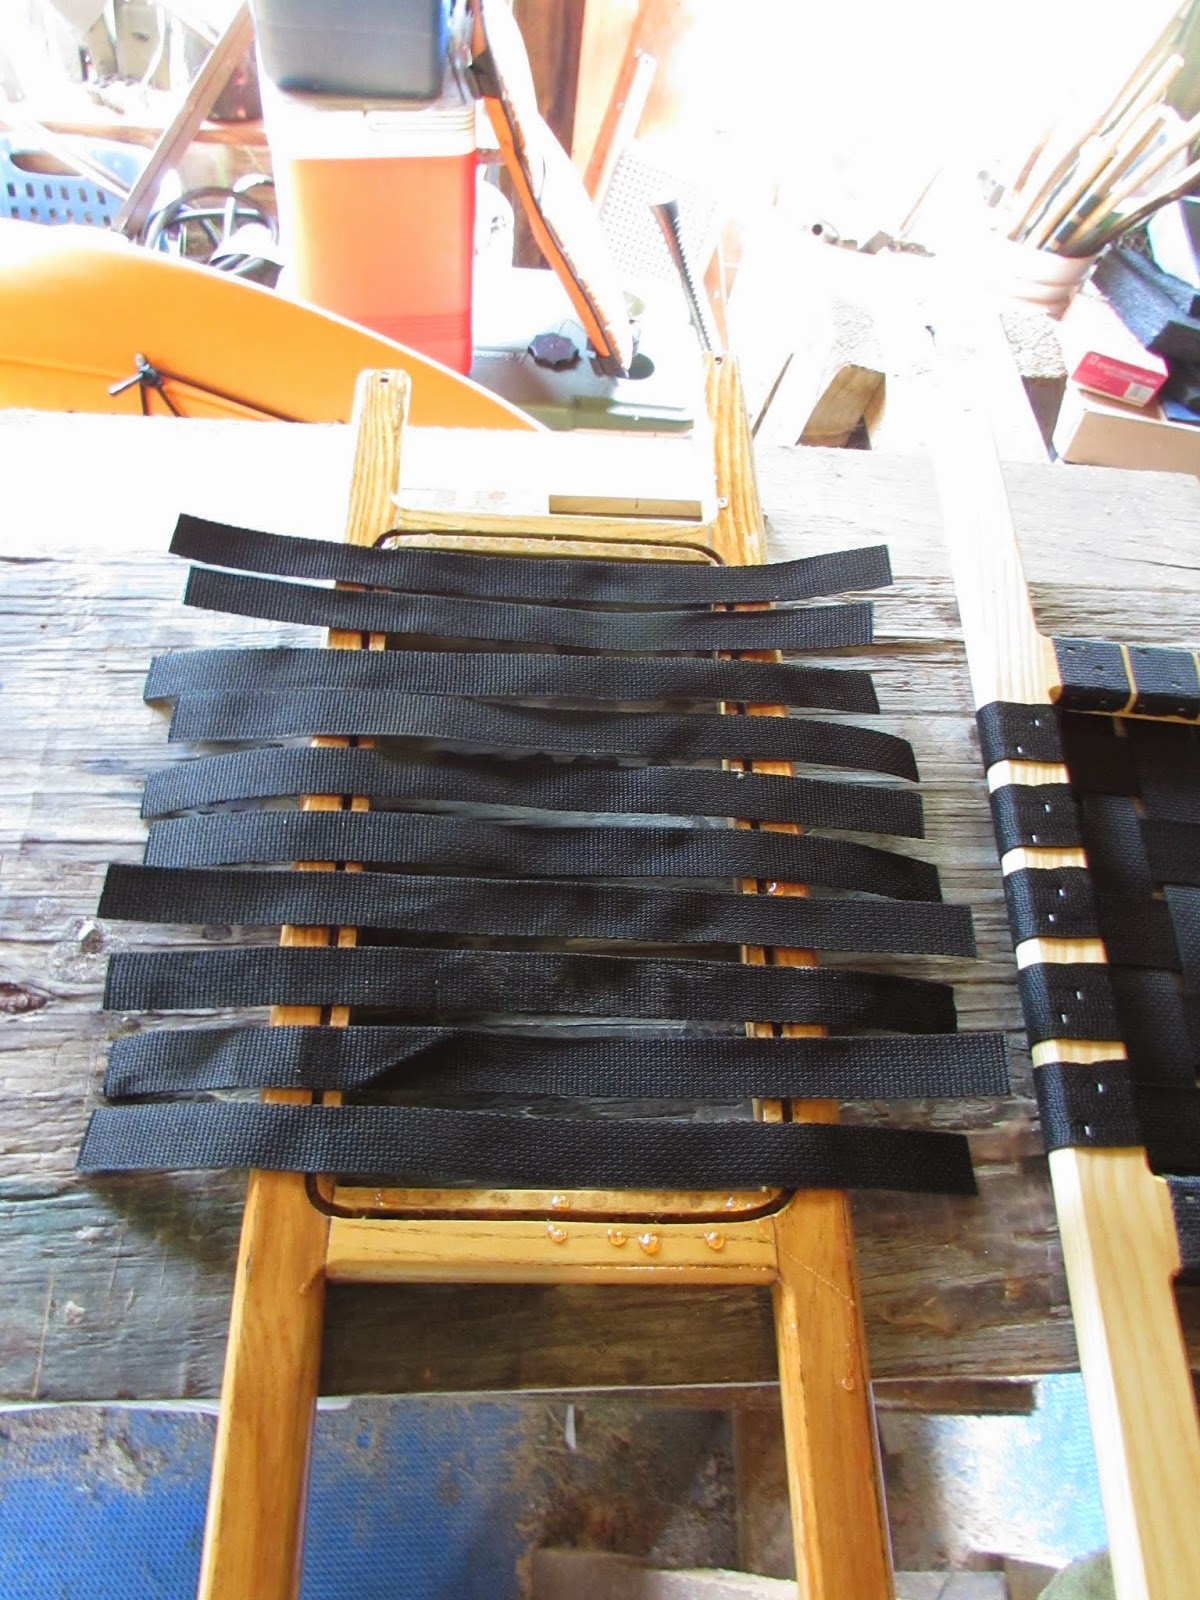
So, all one has to do is staple one end in and the pull like a bastard, it helps to have strong hands for this and then staple the top end in then bend the web in and staple that in as a second anchor.
 |
| The tab gets stapled as well |
 |
| First row done. |

I was psyched to get it in place and spent a bit o' time doing that. I had the original hardware and used that although I am not a fan of those nuts that have the nylon insert in them, they are a bear to use but being the cheap ass Yankee I am I went that route, I do know they are rock solid!
 | ||
| Not my favorite nut to use! |
I got the seat in and decided to add the thwart as well and thought it turned out pretty good. I may dick around with a second thwart down the road but need to attend to the hole and dent next.
 |
| Seat all in! Good Deal! |
 |
| Thwart in, had to pull in a good inch to make it fit. |
More To Come.
July 26, 2014
This morning I hauled the boat out as I needed to empty it of what is bits of shale. Now, I have no idea where this poor hull was stored but it seemed to have a lot of stone under the gunwales, wedged tightly in there. One piece had me puzzled right from the beginning and I thought it was part of the boat.

 |
| First round of pounding! |
 |
| This was the stern end! |
 |
| A boulder! |
 | |
| Make shift tools to get out the rocks! |
More To Come.
July 29, 2014
Time to try to fix the hole. I decided to try to patch the hole from the inside and from past experience I thought maybe a hunk of cardboard would make a good backing patched on the outside. I haven't done this before but am using thickener for the epoxy which according to everything I've read will turn it into the consistency of peanut butter which is what I want. I cut a piece of cardboard and taped it onto the outside of the hole and then mixed my butter up. It was slick and like working it. I should mention that before I did this I borrowed a heat gun and with help got the majority of the dent out but playing with heat guns and royalex is dicey work. In the end I split the vinyl cover a bit.
 |
| Heat gun in action |
 |
| Had to stick my finger in to push out the heated stuff. |
 |
| Pushing with my fist to pop out the dent as best I could. |
 |
| Cardboard taped into place |
 |
| All secured |
 |
| Thickened Epoxy |
 |
| Don't do this! It don't work! |
 |
| Still left with a hole! Aaaaaggghh! |
More To Come.
July 30, 2014
I thought about a new approach all day and after work I decided to tackle it from the outside. So, I resorted back to wax paper and tape on the inside to seal the back of the hole as I know this works.
 | |
| Invest in masking tape! |

 | |
| No Dripping! |
I waited about two hours but of course in between kept pulling up a corner to test how close it was to pulling off the Peel Ply, I've never worked with this stuff before! When the time came I pulled it off with one hand but it was a bit hard to do and thought maybe I had waited too long. Nope! The Dynel stuck with out pulling off at all! It was also much smoother to the touch then without using Peel Ply!
 |
| A tug |
 |
| keep tugging |
 |
| grunt a little more |
 |
| almost done |
 | |
| A very clean patch! |
I also got the middle thwart in and this boat is rock solid now!
More To Come.
July 31, 2014
I laid down the last patch this afternoon on the side of the hole. The thickened epoxy I put down yesterday needed a little help. A patch of Dynel and called it good. Now it is just drying time and when a few days have gone by I'll paint over the outside patch with Hunter Green paint and call it good.
I am hoping this will be a sweet solo whitewater boat and plan on taking it out on the confluence of the Merrimack and Contoocook River on Sat morning where there is a nice mix of small rapids and flatwater by the putin.
All in all it has taken me three weeks to pull this hull back to water use again but most of that was waiting time for drying of seats, resin and other materials!
Aug 1, 2014
I decided it was time to take this hull out for a test paddle. I put in on the confluence of the Contoocook and Merrimack. The first thing I noticed is that my seat is too far back! Goddamn IT! Next the free board is huge on this small hull. Now the worst thing was when I tapped my foot on the bottom it was like a big piece of fat that ya slap and it ripples! Holy Christ the whole floor of the canoe was like wave of Royalex! I thought I was going to go mad! Why O' Why!
Despite this I kept paddling just to see how the rest of the boat responded. I knew at fourteen feet it would be one of those hulls that keep you on your toes, constantly correcting but it does track fairly well as long as you keep up a good cadence with your paddle is fairly fast. I was not disappointed with this aspect and it was about what I expected. It turns on a dime which is mighty sweet as I am not a fan of boats that make me plan turns ahead of time!
So from this shake down cruise I know I have to move the seat forward maybe four inches and lower it maybe an inch and am thinking of tilting it for kneeling purposes. As for the quivering floor after talking with the Guru I think that after Mad River sold out to Confluence they had a couple of years of shitty Royalex and I think this hull is one of them as it is an 04. It is so soft it is crazy! I'm going to try to put some foam blocks under the seat to apply some downward force on the hull. Apparently another canoe company does this on a certain model and see if that will stiffen up the hull some. I'm still trying to get used to the unusual free board. My Colander has a half inch on this hull but doesn't appear as deep! It visually creeps me out like I'm reaching way to far to reach the water with my paddle!
So with all this shit to figure out I guess I'm not done so there is...
More To Come.
August 19, 2014
After much thought, testing, and more thought I have decided that this boat is going to live on my buddies lake. The RX is so weak that I have absolutely no desire to try to reinforce in any way shape or form. This despite having putting in a second forward thwart. It would be costly, time consuming and because of the thinness of the hull I wouldn't trust it for any whitewater I want to run here in New England's rocky rivers, now way now how! I am not kind to my boats as they are meant for running hard. Damn!
I want to curse Confluence for putting in the RX stoves in backwards and messing up a bunch of good hulls but what the hell ya gonna do! It was a good fix just on a shitty hull which almost makes me want to cry, hell, a can of liquid courage saved me from that fate! Guess this little chapter of canoe fixing is over. Just a quick lesson that I can use down the road!
http://blog.superiorpowersports.com/2010/02/change-your-own-scooter-oil-and-save.html?showComment=1533190995753#c2601557140808575491
ReplyDeleteit was a wonderful chance to visit this kind of site and I am happy to know. thank you so much for giving us a chance to have this opportunity.. repair-electric-scooter
ReplyDeleteHuge thanks to you and canoetripping by saving me from buying this canoe.
ReplyDeleteWhat a fun read though.