Just finishing off one project I walked into another. While out in April on the river my good friend Scott says, "You want that Bell Mystic?" Turns out it has been kind of a cursed boat. Bought new and never used it took a road trip to Florida and on the way to the put in the boat dances off the trailer and does a nose dig into the road doing some damage. Fast forward and my friend has purchased new gunwales for it. We spent an afternoon putting them and that was the last I saw of the hull.
The day I heard ya want the Mystic I knew something was up. As the tale goes a sheet of plexiglass blew out of a cupola, slide down the barn roof and at some crazy angle and punctured the Mystic at around mid-ship. A nice eleven inch slice through the hull and not clean as well as a couple of smaller punctures as well. I eventually went and picked it up and it sat on sawhorses for another winter.
October 2018
Having spent the summer tearing down my old workshop and rebuilding a new one kept me from working on the Mystic. I kept wandering over and eyeballing all the damage and wondered what I had got myself into...again! My intention was to fix it best I could and sell it for the best price I could get and give the cash back to Scott. I had no need for an 18' 6" long canoe as I solo and when I do tandem I always end up in the bow which I despise!
Sometime in November my old paddling partner Hal the Gullboy came up to help me install new windows in the new Canoe Shed and during a break he wandered over to the boat and started drooling!
"What's ya gonna do with it?" he asks.
"Fix it up and sell it." answers I.
By the end of the weekend it was going to be his once I was done with the fix, sometime before May as he wanted it for a race up in Maine. I told him I would have the patches done by then.
December 2018
I had the walls of the shed almost done and the ceiling done in the Canoe Shed and brought the Mystic in to hang from the ceiling for the winter getting in just in time before the snow came. I kept looking at that jagged, ugly puncture and kept thinking being Kevlar how in the hell am I going to clean that up so the edges met? I guess a few pictures are in order to give an idea of the damage.
 | ||
| This is what a pristine one looks like |
 |
| End Cap brittle from UV/outdoor storage |
 |
| 11" + puncture forcing material inward with smaller wound below |
 |
| Puncture from the outside of the hull |
 |
| Another View |
 |
| Smaller puncture below the big gash |
Kevlar is a different beast. It doesn't cotton to that kind of repair effort as it will not cut cleanly but will create a fuzz which is maddening to deal with! Multiple thoughts kept coming up but I dismissed all of them and left the hull hanging from the ceiling for the time being.
Now in the meantime Hal had decided he wanted a sliding seat in the bow. Wenonah carries one with a web seat vs a bucket seat.
http://www.wenonah.com/Canoe-Seats.aspx
He will be purchasing it and together we'll do the install which is something I've never done. Should be interesting.
March 2018
Fast forward a few months and I was slotted for lower back surgery which would keep me out of work for four to six weeks. Thinking it would be too big of a deal I went for it. Well, it was much more invasive than I had anticipated and being in very slow motion there is little I can do on the hull.
March 21, 2018
Hobbling down the Canoe Shed I looked the gash over again and just for the hell of it got out a decent set of scissors, pushed the lower side in so the jagged edge was separated from the top lip and slowly started cutting. WTF! It was working! In less then five minutes I trimmed enough off to have a small gap between the lips instead of them overlapping and any pieces of jagged and jutting kevlar was gone. Due to my back I called it quits there but a hair more trimming is in order. Sometimes overthinking a process can set one back and I'm reminded of the KISS rule! Tomorrow I'll give it another shot to clean it up a little more.
 |
| Widened Gap From Outter Hull |
 |
| Sissors, Debris and cleaned inside |
 |
| Another view of the inside |
More To Come.
March 24, 2018
Hobbled down the shed to see about drill out the thwart brackets. I was hoping they were just under the gunwale and not hooked over the top of the hull. I drilled out the pop rivets and using a pair of pliers was able to gently rock them out saving them for down the road. This hull needs three thwarts so I'll be saving them and moving them back after the sliding seat is installed.
 |
| One pop rivet drilled out |
 |
| Bracket out with plier |
Next was taking the front seat out. Simple, just drill out six pop rivets. Took all of two minutes and it was done. Later today I'll seal those six holes with G-Flex and call it good. Hal is going to order the sliding seat so we can get that in towards the end of April beginning of May. The next step is to clean up the second gash as best I can and then later in the week begin to fill those and get cloth on them.
 |
| Seat out, saving for future use |
March 26-28
I wasn't going to work on the thwarts but with down time I decided what the hell I can at least slop some coats of varnish on them. A quick sanding was all it took as most of the old treatment was weathered off already. Unfortunately the butt ends where the bolt holes are are toasted from being stored outdoors. I've run into this before and am going to fill all the holes and the butt end with G-Flex and then re drill the holes. Since they are mounted on an aluminum mount this should work just fine.


 |
| New Fire Starter |
 |
| Cleaned up from cane |
 |
| An hours worth of sanding |
 |
| The bottom side |
 |
| The top seat, Ed's Canoe Seats is going in |
More To Come.
March 31, 2018
Today was the leap of faith, time to fork around with the gash! The biggest problem was that after I trimmed the gash so the ends could meet was that the top part was still deciding to stay inward away from the bottom part. Took a short video to explain this.
What had me a bit stumped was what to use for weight to push that lip to meet the other. I had a sandbag but needed a least three to four more but with my back issue I could swing it. What to use? I mulled this over a can of liquid courage and came up with the answer. Water bag! A good fifteen pounds or so I thought. That supplemented with, in the end, a sandbag and large coffee can filled with bolts, nuts and other weighty stuff.

What I used for the patch was a strip of S-Glass tape I bought a year ago for another project and never used. It seemed to do the trick. I'll probably use it on the inside as well. I waited quite a while reinforcing myself with a couple of cans of courage as I never know how these hair brained things will work out. This third short video shows that the edges were flush but after an hour the top of the gash decided to pull back a hair. Turned me into a liar! Besides it hurt like hell to go under the boat!
So I'll be waiting for the cure on the first patch and then in the morning I will jury rig some wood supports that can push on the top lip of the gash to even it up with a layer of S-Glass, thickened epoxy and maybe some left over chipped up kevlar odds and ends. What is real nice, heat! Yup, a heated workshop for a change. Going to make this so much faster and easier! A balmy seventy degrees in the shop. Tomorrow brings the next challenge in this fix.
More To Come.
April 1, 2018
This morning I decided to dub around with the inside of the gash. I have been thinking about this for quite a while and came to the conclusion that I was going to reinforce the gash with thickened epoxy and then cover it with a layer of Dynel.
I used West System 406 Colloidal Silica thickener. Word of advice don't sneeze into it! Took a bit to clean up! After I mixed it up I still waited a bit for it to thicken some more. Good move as it was easier to work with. Using a popsicle stick I gobbed it on, waited a bit to smooth it out, added some more and repeated.

 |
| Epoxy with thickener |

 |
| Added to the gash, should fill it nicely |
 | ||
| Peel Ply to help smooth it out. |
More To Come.
April 4, 2018
Today I decided to put Dynel patches on the outside over the E-Glass as well as tackle the second gash down a little lower. I put the waxpaper and tape barrier on the inside, tipped the hull on it's side and proceeded to mix up a slightly thickened batch of G-Flex to fill the hole. I got the lips to meet as best I could but the internal rib prevented me from making the cuts to the gash that I wanted. It is what it is sometimes.
I gobbed the G-Flex on and spread it out and then as it was getting setup I slopped on some straight epoxy and laid some more E-Glass followed by a layer of Dynel and then Peel Ply. I think I waited a tad too long for the Peel Ply but it did help some. No pictures as I was too lazy to walk back up to the house for the camera.
Later at night, OK around one o'clock in the morning I wandered down and pulled the Peel Ply, turned the canoe back onto its bottom and took a look at things. Now sometimes when I'm working on these damaged hulls I focus on the most obvious wounds and only later notice some more damage. There is a what I call a stress fracture running about fourteen inches from the gunwale down to the chine. It's not through and through but upon further probing and poking it is a very weak area as is the other side which has a patch but still week. I think it is probably from the nose dive it did years ago and folded there. This area is between the first internal rib at the bow and the second internal rib set back at twenty-one inches.
So, after some conversations and some long thinking I'm going to add a double layer of Dynel on both sides going down about twenty inches, the internal ribs are fifteen inches long, so bilge water can flow instead of being damned off to strengthen that area as well as cover the long stress fracture with E-Glass inside and out and on the outside also add a layer of Dynel as it's on the chine.
A lot more work then I anticipated but will be worth it in the long run.
More To Come.
April 6-8
Well, I knew I had the third thwart for this hull somewhere, got a little lost in the shuttle between the old shed tear down and new shed rebuild. I found it and out of curiosity jammed it in near the original position to see if it would help stiffen up the hull in the bow area some. It did help quite a bit so I decided to forgo the extra Dynel in there. I did however add some E-Glass strips to the "stress crack" both inside and out. I really like using Peel Ply, no sanding.
In all I ended up putting nine patches on. With the new sliding seat installed, still to come, and a new and longer thwart this hull should be pretty solid and still light enough. Are the patches pretty? Nope but considering all the damage they will work just fine and make for a good story down the road.
I finally moved this long boat outta of the Canoeshed with the help of my better half, only cost me a lunch at Olive Garden and moved the Satan Boat back in for some modifications I've been wanting to do. Still waiting on a pedestal seat to install in the Caddilac, Lettman kayak since the old Phase III seat popped out last September on Umbagog. Hated that damn seat anyway!
Next step is to get it to Hal's workshop and get the last two pieces installed.
More To Come.
April 10, 2018
Funny things happen with these canoe rebuilds and modifications need to be done. After taking out the front seat of the Mystic in order to put in a sliding seat I was informed that it wouldn't be in in time for the race. Time to put the old seat back in. The cane was beat and the spline was broken in a couple of places and I hate cane, did I say that again?
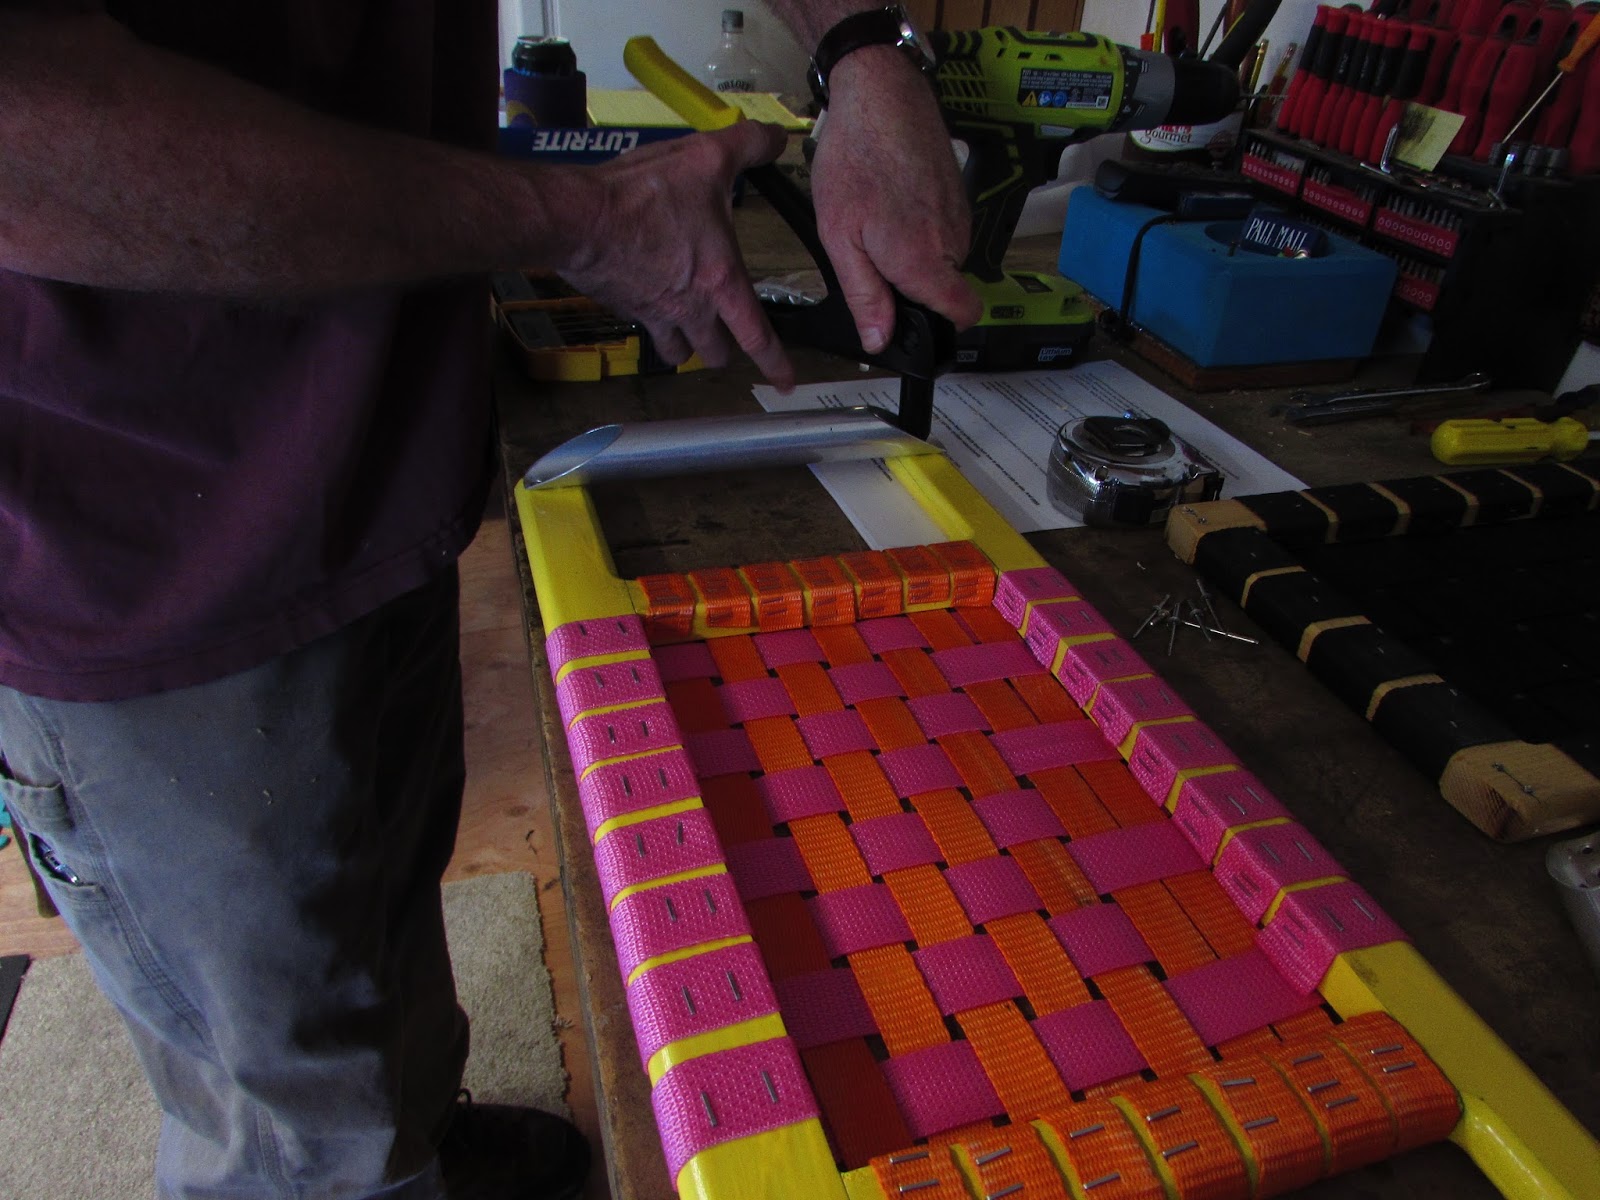
After several emails between Hal and myself he relented and said if you're going to web it go ahead. Doesn't sound all that nasty but I was threatening to use pink webbing and Hal's last email said I needed to paint the seat an obnoxious color. OK, it can be done.
So, after talking it over with the better half she comes out with several colors of spray paints. It was decided the seat should be yellow, Sunshine Yellow to be specific. I sanded the seat down lightly enough for the paint to adhere and then began three coats. Yellow you ask? Well it will add to the ugly with some purple stencils added to the seat frame. From there some pink and orange webbing will be added.
A short video of the materials on hand to work on this project. I think Hal will be proud of the looks.
It was decided a nice yellow color to the seat frame would be appropriate. It will stand out and bring the highlights of the pink and orange webbing into focus and perhaps make one heave up a tad!


More To Come.
Pink Seat Build:
Time to add the pink webbing, actually Pink and Orange. Enough of an eyesore to almost call it "pretty"! OK, that is taking it a tad to far unless multiple cans of liquid courage are involved.
I'll let the pictures tell the story!


I thought the purple hearts would be a nice touch but they bleed through some. Hal asked for something that stood out and I think this fits the bill.
As it turned out the sliding seat he ordered came in on time and he's going to come up so we can install that instead, bummer, I kinda like this seat!
April 21, 2018
Hal showed up with a Wenonah Sliding Seat that we have to fit in a Bell Mystic. Of course no directions on how install the damn thing but once we had it out for a dry fit it slowly became clear how to do. This took a few hours of head scratching, a lot of measuring and questions to each other. I work solo most of the time but for a project like this is was great to be able to bounce ideas/suggestions off each other. We make good shop partners.
One of the first things we found out was the seat that came with the set up did not have "arms", just a seat that mount to the sliders. With that on the other outer hardware/frame it didn't fit, too narrow. In the end we mounted the Pink Seat! Hell, it worked and Hal actually liked it. Nobody is gonna want to steal this boat.
 |
| Two Seats. Black is factory with sliders, Pink one. |
 |
| Factory Seat with Tubes, pop riveted in. |
 |
| Figuring out measurements a level |

 |
| Adding the sliders to the Pink Seat with rivets |
 |
| Washers behind every rivet for added strength |
 |
| Brackets are in |
 |
| Hal adding the thwart to the brackets |
 |
| A Thing of Beauty!! |
 | |||
| Going to a New Home. |
So the Bell Mystic is off to a new history, racing for a while, then who knows. It's a hauler so I see the Allagash River in its future.
Hal did help me move another boat into the Canoeshed. Next project and this one has a bit of interesting history behind it. For another day though.
After sneezing into the epoxy, will the boat be slick as snot?
ReplyDeleteYes, I believe that science has proven the slick as snot theory!
ReplyDelete